All posts by admin

Week 6

Session 1: Today I’ll be demonstrating the techniques necessary for completing part one of the “Inventing New Sounds: Synthesis and Sampling” project. In order to create synthesized sounds we will use Propellerheads Reason. This software offers several devices for producing analog modeled, synthesized sound. One of the easiest, yet great sounding, instruments to learn about synthesis is Subtractor.

Assignment 3: Inventing New Sounds – Synthesis and Sampling

Session 2: Today we’ll be reviewing more capabilities in Reason and having a discussion on the concept of sampling. After the discussion I’ll be demonstrating how to use the NN-XT sampler in Reason. We will look at loading samples and applying envelopes and other parameters to the sampled sounds.

Week 7

Session 1: Today we will look at the requirements for the “ADR, and Foley for Moving Images Project”.

The final project for the Sound Design class involves the combination and synchronization of sound and visual media. The goal of the project is to involve all the competencies listed class the class, including two new competencies. First, “Synchronize audio and video tracks to ensure proper playback and continuity” and second, “Incorporate the techniques of Foley/ADR in production”. Therefore, visual media that requires voice acting is necessary. Secondly, studio time to replace “on set” dialogue using ADR techniques is required.

In order to efficiently meet these requirements, it makes sense to form groups with a minimum of three student members. Three roles are necessary for each group – a producer, a sound designer, and one or more voice actors. All members of each group will share the engineering responsibilities. The producer will be responsible for writing the story and presenting a script to the group, the sound designer will be responsible for recording Foley and collecting sound effects and ambience for the piece, and the voice actor(s) will provide their talents on set and in the studio during ADR.

Sound Design Project 4 – ADR and Foley for Moving Images

Session 2: Today we will be presenting the Synthesis and Sampling projects. Afterward let’s continue working on solidifying the groups for the final project.

Week 8

Session 1: Today’s topic for discussion is ADR, or Automated Dialogue Replacement. ADR is commonly used in movies to replace the on set dialogue. Often the on set dialogue is unusable due to background noise, poor recording levels, or a myriad of other issues that arise while shooting the scene. Re-recording the audio in the studio ensures that the the recording is clean and dry with no background noise.

In class exercise: Copy the ADR_Exercise.zip from the WDIM drive. Decompress the .zip file and open the Pro Tools session. Experiment with reducing the noise levels using the “Expander/Gate Dyn 3” insert. Next re-align the dialogue in the scene. There will be five places where you will need to split the region in order to properly synchronize the dialogue.

Reading:
ADR: “Automated” or “Automatic” Dialogue Replacement

Session 2: During week 9 and 10 we will be scheduling ADR sessions for each of the groups during lab time in room 009. The goal of these session will be to help prepare content for your final project and learn how to use the Pro Tools HD system for dialogue replacement.

Also, starting next week we will begin milestone reviews of your final projects so far. On session 1 of week 9 I would like to see a rough draft of your script and sound design notes from each group. Here are the requirements for the first milestone:

Sound Design Final Project Milestone #1
1. Present a rough draft of your script so far
2. Also present sound design notes
3. Finally present a schedule the of shooting and sound design
3. Due during lab of session 1, week 9

Reading:
Review pages 32 – 25 in “Sound Design” by David Sonnenschein

Week 9

Session 1: No class due to holiday.

Session 2: Today is the first of our in class ADR sessions. One or two of our group will be re-recording their voice actors to picture using Pro Tools HD in the recording studio. We will start by importing the video for the shots into Pro Tools, then projecting that video through the window and into the recording stage. The voice actor can watch the video as they re-record their dialog.

Week 10

Session 1: Our schedule for today includes the second in class ADR session. One or two of our group will be re-recording their voice actors to picture using Pro Tools HD in the recording studio. We will start by importing the video for the shots into Pro Tools, then projecting that video through the window and into the recording stage. The voice actor can watch the video as they re-record their dialog.

Session 2: Today is the final in class ADR session before presentation next week.

Syllabus and Meeting Times

This course provides students with the skills to design interactive interfaces. Emphasis is placed on examination of the information architecture, communication and business goals, media and delivery platform. Students will develop an interface prototype that meets the goals of the project. (Course Prerequisite: GD1420 Image Manipulation)

Instructor: John Keston

Meeting Times and Location Section (M/W):
Session 1 / Session 2
M/W 11am – 2pm (with appropriate breaks), Room 305, Pence building

Syllabus:
IM2440 User Centered Interface Design Syllabus

Required Reading:
Don’t Make Me Think (second edition) by Steve Krug

Recommended Reading:
Designing with the Mind in Mind

Week 1 | Week 2 | Week 3 | Week 4 | Week 5 | Week 6
Week 7 | Week 8 | Week 9 | Week 10 | Week 11

Week 1

Session 1: Today we will start by introducing ourselves and discussing the goals of the class. User centered interface design (UCID) is an established field that has evolved from user-centered design (UCD) concepts including use cases which have been in use, particularly in software development, since the early 1990s.

Reading:
User-Centered Design Encyclopedia Chapter
Google Glass

Session 2: Today in class I will briefly describe the reading assignment and discuss the requirements for the first concept summary. All writing assignments should be formated using MLA (Modern Language Association) 7. Also review the Purdue OWL MLA Guide.

Here are a few discussion points from the reading:

• Make it easy to determine what actions are possible at any moment.

• Make things visible, including the conceptual model of the system, the alternative actions, and the results of actions.

• Make it easy to evaluate the current state of the system.

• Follow natural mappings between intentions and the required actions; between actions and the resulting effect; and between the information that is visible and the interpretation of the system state.

Concept Summary #1: User-Centered Design Encyclopedia Chapter
Due: Week 2, Session 2 (at the beginning of class)

Write a one to two page concept summary of the User-Centered Design Encyclopedia Chapter assigned on Week 1, Session 1. Pay particular attention to the involvement of users in the design process.

1. Use MLA 7 format for your summary and works cited.
2. It is acceptable to quote the reading, but at least 80% should be in your own words.
3. Avoid platitudes or clichés like “very” or “everything happens for a reason”.
4. Bring in a stapled paper copy on the day it is due.

Assignment 1: Photo examples of good/bad UCD
Due: Session 1, Week 2 (at the beginning of class)

Take photographs of six examples of good and/or bad examples of UCD that you use regularly. Do not include software (i.e. no mobile phones, game consoles, or computers). Also, include multiple examples that are not electronic devices. Be prepared to show and discuss your examples as they relate to the concepts presented in the reading assignment. Place the photos in a folder on the drop off drive under /John Keston/IM2440/<Last, First>/Assignment 1/ before class on Week 2, Session 1.

Week 2

Session 1: Please be prepared to present your six photographs of user-centered (or not so user-centered) objects.

Reading for next week:
Chapters 1 – 5 of Don’t Make Me Think (second edition) by Steve Krug

Recommended Readings:
The “Design” of Web Design

Concept Summary #2: “Muddling Through”
Due: Week 3, Session 2 (at the beginning of class)

Write a two to three page concept summary of chapters one through five from Don’t Make Me Think. Be careful to include a discussion of topics from each of the chapters assigned. Discuss the importance of clear visual hierarchies, conventions, breaking pages into clearly defined areas, making what’s clickable clear, and minimizing noise.

1. Use MLA 7 format for your summary and works cited.
2. It is acceptable to quote the reading, but at least 80% should be in your own words.
3. Avoid platitudes or clichés like “very” or “everything happens for a reason”.
4. Bring in a stapled paper copy on the day it is due.

Session 2: Today please have stapled paper copies of Concept Summary #1 ready to turn in. After discussing the reading, we will discuss the final requirements and presentation date for the research paper project, otherwise known as assignment 2. Although it is only the second assignment it will not be due until mid-term. This will give you time to select a topic and collect research materials before beginning the writing process.

Assignment 2: Research Paper (20 points)
Due: Week 7, Session 1

General Terms and Principles
Research and Use the following terms as related to interactive design in your paper:
Usability
Heuristics (identify at least three key user centered design heuristics)
Accessibility
User Centered Design

Define and discuss one topic in the world of User Centered Design. Research until you find a topic that interests you. Use visual examples in your presentation (saved on Drop Off drive).

Your paper should be a minimum of five pages long, double-spaced, and contain a minimum of three visual examples. Cite your sources on a separate “Works Cited” page. Professional presentation of your work both written and oral is expected. Layout, typographic, and grammatical rules will be considered in your final grade (use MLA 7). Turn in a printed copy and a .doc version to the class drop off folder. The .doc file should be titled with your name and placed in the following folder:

Drop Off/John Keston/im2440/<Last, First>/Assignment 2/LastFirst_research.doc

Competencies
Identify interface design heuristics
Define an interactive design approach
Write a design concept note
Design interface prototypes using appropriate production tools
Develop a production plan for the interface design

Your work will be evaluated on the professional presentation, college level writing, meeting requirements, use of terms, subject matter, and design.

Week 3

Hansel and GretelSession 1: Let’s start today by discussing the reading assigned last week. Be prepared to talk about key concepts in the book. I will also be returning last weeks papers to you with my feedback and your grades. In class we will discuss MLA 7, grammar, and the purpose of a concept summary.

Smashing Magazine’s Showcase of Web Navigation

Concept Summary #3: “Designing Navigation”
Due: Week 4, Session 2 (at the beginning of class)

Write a two to three page concept summary of chapter six from Don’t Make Me Think. Be careful to include a discussion of each key concept from the assigned chapter. To name a few, discuss the following: the purpose of navigation, conventions, sub-navigation (secondary, tertiary, etc.), persistent or universal navigation, page titles/name, and so on.

1. Use MLA 7 format for your summary and works cited.
2. It is acceptable to quote the reading, but at least 80% should be in your own words.
3. Avoid platitudes or clichés like “very”, “mainly”, or “now I feel like I understand”.
4. To receive credit, bring in a stapled paper copy on the day it is due.

Session 2: In class today I will be presenting our next assignment. This exercise involved organizing topics into persistent, secondary, and tertiary navigation. I will present you with a web site concept and it will be your responsibility to organize the topics into a user-centered navigation scheme.

Week 4

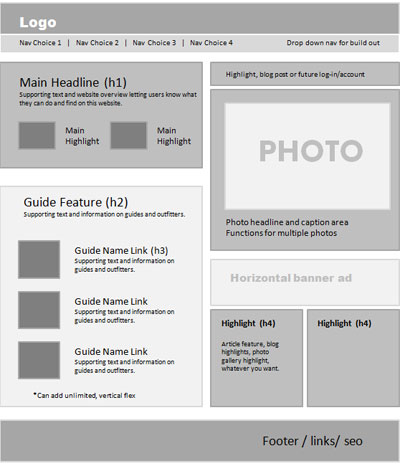
Session 1: Let’s look at the requirements for the next project titled “Road Map.” The purpose of the “Road Map” project is to organize a list of topics for a hypothetical website. The model that we have chosen is a restaurant. Restaurants have a long list of areas that they want their customers to be aware of. This gives us an excellent prototype for formulating a user-centered navigation scheme.

Assignment #3 “Road Map” (15 points)
Due: Week 5, Session 2 (Beginning of Class)

Organize a minimum of twenty of the following topics into a complete navigation system that includes primary (universal or persistent) navigation, secondary (sub) navigation, and tertiary (sub-sub) navigation links. Start by creating a flow chart that shows where each topic is located. Next build a wireframe that illustrates how a typical page layout might be organized based on your navigation scheme. Draw from the reading (especially chapter six) and look at other restaurant websites to gather ideas. Use Adobe Illustrator or a free online tool that is made specifically for charting, like Lucid Chart to create the documents.

About Us
Beer
Birthdays
Breakfast
Calendar
Catering
Contact Us
Dinner
Drinks
Employees
Happy Hour
Home
Hours
Jobs
Location(s)
Lunch
Menu
Nutrition
Parking
Photos
Press
Reservations
Reviews
Shop
Social Media
Soft Drinks
Specials
Sponsorships
Vegetarians
Wine

Presentation:
On the day that the project is due place both documents in your folder on the drop off drive before class starts. During your presentation show how you organized the navigation items and demonstrate how your layout contributes to the navigation scheme. Show at least two websites that you studied to develop your ideas.

Resources:
Example of a Flow Chart for Site Navigation
A Typical Wireframe for a Web Design
Lucid Chart – Free online flow chart software

Concept Summary #4: “Designing the Home Page”
Due: Week 6, Session 2 (at the beginning of class)

Write a two to three page concept summary of chapter seven from Don’t Make Me Think. Be careful to include a discussion of each key concept from the assigned chapter. To name a few, discuss the following: the purpose of navigation, conventions, sub-navigation (secondary, tertiary, etc.), persistent or universal navigation, page titles/name, and so on.

1. Use MLA 7 format for your summary and works cited.
2. It is acceptable to quote the reading, but at least 80% should be in your own words.
3. Avoid platitudes or clichés like “very”, “mainly”, or “now I feel like I understand”.
4. To receive credit, bring in a stapled paper copy on the day it is due.

Session 2: Today Concept Summary #3 is due. Please have stapled paper copies to turn in before class begins. During class, let’s discuss the concepts presented in chapter six. Be prepared to read from your paper and participate in a discussion regarding the key concepts presented in the reading.

Week 5

Session 1: No concept summary is due this week because of the “Road Map” assignment that is due on session 2. However, today is the required milestone for the “Road Map” project.

Assignment #3 “Road Map” Project Milestone
1. Illustrate which items you have selected for persistent navigation.
2. Show your wireframe document so far (with navigation)
3. Show your flowchart so far (include some secondary navigation)

Session 2: Will will start today with your “Road Map” project presentations. Do not forget to show your flowchart, wireframe, and a minimum of two research links.

Week 6

Session 1: Today is the first of two milestones required for the research paper. By the end of class please have an outline of your work so far including a detailed description of the area for your research.

Session 2: Please have paper copies of Concept Summary #4: “Designing the Home Page” for me by the beginning of class. We will discuss the key concepts from chapter 7 of Don’t Make Me Think. After our discussion please be prepared for your second research paper milestone described below:

Explain how your research involves UCID
Discuss the three UCID heuristics
Explain how accessibility is important to your example

Tips for Using Google for Research

Concept Summary #5: “Usability Testing”
Due: Week 8, Session 2 (at the beginning of class)

Write a two to three page concept summary of chapters eight and nine from Don’t Make Me Think. Be careful to include a discussion of each key concept from the assigned chapters. To name a few, discuss the following: the myth of the average user, focus groups versus usability tests, excuses for not testing, etc.

1. Use MLA 7 format for your summary and works cited.
2. It is acceptable to quote the reading, but at least 80% should be in your own words.
3. Avoid platitudes or clichés like “very”, “mainly”, or “now I feel like I understand”.
4. To receive credit, bring in a stapled paper copy on the day it is due.

Week 7

Session 1: Your research presentations are due today. Please turn in paper copies of your research papers. Support your presentation by showing the images that you found during your research. You may read from your paper, but it might be more suitable summarize the content of your research. Each presentation will require the following steps:

1. Present the concepts and ideas developed during your research
2. Show the images that you found regarding your topic
3. Defend your thesis during the feedback and discussions

Session 2: Let’s discuss the details about the next project.

Week 8

Session 1: Today we will discuss the next project which involves creating a minimum of three digitally produced mockups based on the work you did for your “Road Map” project.

Assignment #4 Restaurant Website Mockups (10 points)
Due: Week 9, Session 2 (Beginning of class)

Mockups are typically non-functional digital designs of web pages. Most designers build them in Photoshop or Illustrator. Mockups differ from wireframes in that they are complete designs featuring a logo, banner image, color scheme, specified typefaces, and content.

Create a minimum of three digitally produced mockups for one page from your “Road Map” project. Use what you have learned about UCID to create visible navigation, accessible content, and an overall useable layout. Pick a page that will contain a significant amount of content like home, about us, press, or reviews. Mockup the SAME PAGE three times in three different ways. The intent is to have a variety of design schemes to choose from or critique.

Mockup Resources:
The 960 Grid System
The 1140 Responsive Grid System
Comprehensive Guide to Mockup Design
Tips for Creating Mockups in Photoshop
Examples of Mockup Sketches

Session 2: Today Concept Summary #5 is due. Let’s discuss your concept summaries. Also, I am assigning our final concept summary for the final chapters in the book.

Concept Summary #6: “Usability and Accessibility”
Due: Week 10, Session 1 (at the beginning of class)

Write a two to three page concept summary of chapters ten, eleven, and twelve from Don’t Make Me Think. Be careful to include a discussion of each key concept from the assigned chapters. To name a few, discuss the following: the reservoir of goodwill, things that increase or decrease goodwill, skepticism regarding accessibility, fears of implementing accessibility, accessibility solutions.

1. Use MLA 7 format for your summary and works cited.
2. It is acceptable to quote the reading, but at least 80% should be in your own words.
3. Avoid platitudes or clichés like “very”, “mainly”, or “now I feel like I understand”.
4. To receive credit, bring in a stapled paper copy on the day it is due.

Week 9

Session 1: Mock project milestone / feedback. Please be prepared to show me your work on the mockups so far. For the milestone you should have at least one of the three designs completed.

Session 2: Today we will be presenting the mockups projects.

Week 10

Session 1: Today concept summary #6 is due. Please be prepared to discuss the key concepts from the reading in class. The rest of the time today we will cover the requirements for the final project. This project involves sketching out the functionality of a interactive application through a series of wireframes.

Assignment #5 Online Take-out Web Application Wireframes (15 points)
Due: Week 11, Session 2 (Beginning of class)

Use your understanding of user-centered interface design to outline the functionality of a web-based application for ordering take-out food from a restaurant. Write a one-page summary of the site’s purpose and features. Next design a series of wireframes (minimum of six) to illustrate the steps necessary for a customer to order and pay for take-out food. Use the landscape mode to design each wireframe to illustrate a desktop, laptop, or tablet computer screen. Take into account the possibilities of multiple menus, multiple item quantities, changes to the shopping cart, different billing versus delivery addresses, and user error.

Session 2: Today I will be reviewing your work so far on the web application wireframes. Please be prepared to show the following:

Assignment #5 Milestone #1
1. Prepare a rough draft of your application summary
2. Prepare at least three of your wireframes for review

Week 11

Session 1: Today is the last session to get feedback on your final projects.

Session 2: Final project presentations.

Syllabus and Meeting Times

GD2480 Designing for the Web

Students integrate design skills with the basic computer language skills (HTML) required in order to create web pages. Emphasis is balanced between the design and technical elements of Web Page design and production.

Instructor: John Keston

Meeting Times and Location:
Tuesday / Thursday
11am – 2pm (with appropriate breaks), Room 304, Pence building

Syllabus:
GD2480 Designing for the Web
Textbook:
Speaking in Styles: Fundamentals of CSS for Web Designers
Recommended Texts:
Fluid Web Typography by Jason Cranford
Textbook: HTML5 and CSS3 (7th edition) Visual Quickstart Guide by Elizabeth Castro

Week 1 | Week 2 | Week 3 | Week 4 | Week 5 | Week 6
Week 7 | Week 8 | Week 9 | Week 10 | Week 11

Week 1

Session 1: Learn about and utilize basic CSS and HTML tags, including divs and tables, in a web calendar of the current year. Our assignment for the week is to create a 12 month calendar for the current year. Each month must contain all the accurate days for the month arranged in a table structure of columns and rows. The requirements for this exercise are as follows:

1. Use CSS to apply a typeface other than the default (Times Roman).
2. Include content besides day numbers (i.e. holidays, etc.).
3. Create borders WITHOUT using the table border attribute.
4. Create navigation to get to every month from any month.
5. Use CSS background images in some of the cells.
6. Use background colors to enhance your design.
7. Upload to your student webspace or comparable hosting.
8. Create a link to your calendar on your project portal page.

This assignment is due Week 3, Session 1.

Resources:
W3 Schools
HTML Cheat Sheet (an excellent html resource)
www.webmonkey.com (a comprehensive web development resource)

Session 2: Today we will be looking more carefully at tables to organize information in a grid, like a calendar. We will also cover some techniques on how to trick tables into being more flexible like using bgcolor and cellspacing to create a border, or using “colspan” within your table data cells to merge cells without days in the beginning and end of months (i.e. <td colpsan="4">&nbsp;</td>). Try adding images and/or text for holidays or birthdays. Also, use “width” and “height” attributes to line up the calendar days. Here’s an example month:

<table width="100%" height="100%">
<tr>
<th width="14%">Sunday</th>
<th width="14%">Monday</th>
<th width="14%">Tuesday</th>
<th width="14%">Wednesday</th>
<th width="14%">Thursday</th>
<th width="14%">Friday</th>
<th width="14%">Saturday</th>
</tr>
<tr bgcolor="#999999" height="20%">
<td colspan="2"> </td>
<td valign="top">1</td>
<td valign="top">2</td>
<td valign="top">3</td>
<td valign="top">4</td>
<td valign="top">5</td>
</tr>
<tr bgcolor="#999999" valign="top" height="20%">
<td>5</td><td>7</td><td>8</td><td>9</td><td>10</td><td>11</td><td>12</td>
</tr>
<tr bgcolor="#999999" valign="top" height="20%"><td>13</td><td>14</td><td>15</td>
<td>16</td><td>17</td><td>18</td><td>19</td>
</tr>
<tr bgcolor="#999999" valign="top" height="20%">
<td>20</td><td>21</td><td>22</td><td>23</td><td>24</td><td>25</td><td>26</td>
</tr>
<tr bgcolor="#999999" valign="top" height="20%">
<td>27</td><td>28</td><td>29</td><td>30</td><td>31</td><td colspan="2"> </td>
</tr>
</table>

Note: The use of HTML escape sequences such as &nbsp; allows you to place special characters into your HTML documents. Less than (“<") and greater than (">“) symbols would not be available without using an escape sequence. View the link below for a complete list of HTML escape sequences.

HTML Escape Sequences

This weeks reading:
Speaking in Styles – Chapters 2, 3, and 4 (Pages 17 – 88)

Week 2

Session 1: Today I will demonstrate everything necessary to produce the calendar project that was assigned in Week 1.

Session 2: Let’s wrap up questions you may have regarding the calendar project today and then begin our discussion surrounding the SCANMIC Project. This project will involve utilizing box model to layout text content and images that illustrate how the SCANMIC criteria applies to a website of your choice.

Assignment: Let’s create single page with the layout, images and type all formatted with CSS. Write the content for your web page as a critique of a website that you consider a bad design. Create a one or two page web based evaluation of the website outlining how your example site does not adequately apply the usability points above. The site you evaluate must be accessible over the internet and shouldn’t be too high profile or contain inappropriate materials. Make sure you include links to the pages that you’re evaluating in your web document also include images to illustrate your points. Links to your evaluations will be due on the drop off drive by Session 1, Week 4.

SCANMIC Evaluation Project Requirements
1. Select a poorly designed “under the radar” website to evaluate.
2. Write a paragraph or two of content for each of the seven SCANMIC points.
3. Create anchors with navigation to each point from the top of the page.
4. Use a linked or imported custom CSS document to format the type and images.
5. Link your evaluation on the drop off drive by Session 1, Week 4.

Student Example:
http://www.daneray.com/examples/scanmic/scanmic.html

Reading Assignment (PDF):
Identifying Web Usability Criteria

Download: IM2420 Problem Set 1
1. All IM2420 problems are due by the beginning of class on the next day that the class meets.
2. Answers must be available via links on the OLS or comparable hosting and copied to the drop off drive.
3. Solutions to each problem set will be given during demonstrations on the day that they are due.
4. Grades will be collected during the solution demonstrations by an assigned classmate.

Week 3

Session 1: By the end of lab today your calendars are due. Today we will cover anchor links or “page jumps”, link targeting, and frames. Anchor links are used to jump to content within an HTML document. The most typical use is for navigating back to the top of a page where a lot of scrolling is required, or to sections within the content.

<a name="top">This is the top of the page</a>
.
.
.
<a href="#top">Go to the top of the page</a>

Link targeting is most commonly used to open the content of a link in a new browser window or tab. This can be achieved by using the “target” attribute and setting the value to blank (i.e. <a href="http://www.external-site.com" target="_blank">External Link</a>).

Targeting is also required to load content into specific frames. I do not recommend the use of frames, but it is still important to understand how they work. Jakob Neilsen, a prominent usability expert, cited “Using Frames” among the top ten mistakes in web design. However, there are rare instances of when frames (generally iframes are preferable) can help solve specific problems. This example shows how a basic frame set behaves.

Stylesheets (technically Cascading Stylesheets), or CSS allow web developers much more control over the look of their web pages than with HTML alone. They make it possible to define styles globally for a site, eliminating the need for repetitive font tags, color tags, alignment attributes and so on. This creates better organization by separating form from structure. Sytlesheets are a critical tool for any web developer and make creating sites infinitely faster and easier, once you’ve learned how to use them.There are four ways to include styles in your HTML documents.

1. Local or Inline is right inside a tag and overrides other definitions. Example: <h1 style="color: orange; font-size: 18pt; font-family: Verdana, sans-serif">This is an INLINE style</h1>

This is an INLINE style

2. Global or Embedded. A better solution is to include the style definitions in a style tag otherwise known as by using the global (embedded) technique. Like this example:

<html>
<head>
<title>Style Demo Page 1</title>
<style type="text/css">
<!--
h1 { color: red; font-size: 24px; font-family: arial }
p { text-indent: 1cm; background: #eeeeee; font-family: courier }
td { font-family: arial }
b, i { color: green; font-size: 20px }
-->
</style>
</head>
<body>
<h1>TEST</h1>
<p>Hello World</p>
<table>
<tr><td>I'm in a TD tag with no font tag</td></tr>
</table>
<b>bold. <u>underline</u> within bold (no style)</b><br />
<i>italics</i>
</body>
</html>

3. Linked stylesheets are even better because they allow you to define the styles for an entire website once, then when you modify the stylesheet the changes take effect over the entire site, or wherever the stylesheet is linked. Here’s how you link a stylesheet:

<html>
<head>
<title>Untitled Document</title>
<link rel="stylesheet" href="/im2420/my_styles.css" type="text/css">
</head>
<body>
<h1>TEST</h1>
</body>
</html>

and here’s what the stylesheet document (my_styles.css) looks like:

/* CSS Document */
h1 { color: red; font-size: 24px; font-family: arial }
p { text-indent: 1cm; background: #eeeeee; font-family: courier }
td { font-family: arial }
b, i { color: green; font-size: 20px }

4. Imported stylesheet go within a style tag, thus allowing you to include other global styles which will override what’s imported. In the following example the h1 definition will override the h1 definition found in my_styles.css:

<style type="text/css">
<!--
@import url(my_styles.css);
h1 { color: #ff00ff; font-family: impact }
textarea { text-transform: uppercase }
-->
</style>

Click any of the following links to view the examples we looked at in class:
style_demo0.html
style_demo1.html
style_demo2.html
style_demo3.html

Reading assignment: Stylesheets are extremely powerful and critical to creating useable, consistent and accessible sites. Please take the time to read the following tutorial and checkout other resources so you can take advantage of these techniques in your projects (note: using stylesheets is a requirement in all subsequent projects).
Web Monkey Stylesheet Tutorial (Getting Started)
W3Schools CSS Reference
Brainjar CSS Positioning Tutorial
Selectutorial – CSS selectors

Session 2: Now we are going to take a closer look at CSS positioning. CSS can be used to format type, but also be used to position and style <div> layers or containers. Just like HTML tables, CSS positioning can be used to arrange content within the browser. CSS positioning also offers some advantages over the traditional table method; primarily that the content can be separated from the layout to provide better site maintenance and accessibility.

CSS vs Tables for Layout
CSS Zen Garden

For the next exercise the content has been provided in a word document. It includes some information about cycling collected from wikipedia. It’s your job to design a set of six pages using the text content provided. Create a consistent design scheme that incorporates images, navigation and type treatments using CSS styles and positioning. The use of tables for this exercise is not allowed. The requirements and a link to the content follows:

CSS Positioning Exercise
1. Organize the content provided into six pages
2. Create a consistent design scheme
3. Include navigation on each page to all the pages
4. Incorporate images into each page
5. Format type, images and the positioning of the content with CSS
6. Each piece of content (including images) should be contained in a <div> layer/container
7. Use of HTML tables is prohibited
8. Due before class on Session 2 of Week 5

Content for the CSS Positioning Exercise
Sample CSS Page Layouts – Step by step tutorial from Max Design
CSS Layout Techniques – Great tutorial on “no tables” layout
Student Example of CSS Positioning Exercise

Download: GD2480 Problem Set 2
1. All GD2480 problems are due by the beginning of class on the next day that the class meets.
2. Answers must be available via links on your Webspace or comparable hosting and copied to the drop off drive.
3. Solutions to each problem set will be given during demonstrations on the day that they are due.
4. Grades will be collected during the solution demonstrations by an assigned classmate.

Week 4

Session 1: Today we will look at a variety of CSS layouts starting with a simple two column, fluid layout with a banner that spans both columns (see code example below). We will also examine 3 column layouts and static width layouts.

<html xmlns="http://www.w3.org/1999/xhtml">
<head>
<meta http-equiv="Content-Type" content="text/html; charset=ISO-8859-1" />
<title>CSS Layout Example</title>
<style type="text/css">
<!--
#banner {
    margin: 10px auto 0px auto;
	width: 80%;
	border: #cccccc solid 1px;
	padding: 3px;
}
#container {
    padding: 3px;
    margin: 0px auto 0px auto;
	width: 80%;
	border: #cccccc solid;
	border-width: 0px 1px 1px 1px;
	clear: left;
	overflow: hidden;
}
#left_sidebar {
    padding: 3px;
	border: #cccccc solid;
	border-width: 0px 1px 0px 0px; 
    float: left;
	width: 30%;
	margin-right: 5px;
}
#main_content {
    padding: 3px;
}
-->
</style>
</head>
<body>
<div id="banner">Content for id "banner" Goes Here</div>
<div id="container">
  <div id="left_sidebar">
  1. left_sidebar content<br />
  2. left_sidebar content<br />
  3. left_sidebar content<br />
  4. left_sidebar content<br />
  5. left_sidebar content<br />
  6. left_sidebar content<br />
  7. left_sidebar content
  </div>
  <div id="main_content">
Praesent ut nulla. Sed tellus magna, tempor sit amet, pulvinar eu, 
dignissim sit amet, purus. Phasellus ultrices massa sed metus. Nulla 
scelerisque, metus a ultricies blandit, nisi arcu lacinia orci, et 
posuere urna lacus bibendum turpis. Maecenas nibh nulla, cursus in, 
pulvinar eu, dictum quis, neque. Curabitur ac purus a ipsum ultrices 
consequat. Aliquam sed velit sit amet diam mattis aliquet.
<br /><br />
Pellentesque habitant morbi tristique senectus et netus et malesuada 
fames ac turpis egestas. Sed bibendum molestie tortor. Sed ut nunc. 
Maecenas purus felis, scelerisque id, egestas ut, pretium et, nulla. 
Nunc nisl arcu, vulputate et, feugiat non, luctus eu, justo. Quisque 
rhoncus. Mauris dapibus orci non dui. Mauris lobortis. Aenean 
gravida pede a justo.
  </div>
</div>
</body>
</html>

Multi-column CSS layouts like these allow for problems to arise. Mis-matched column heights for one, but also issues related to variations in browser defaults.

Multi-column height solution
Normalize CSS file

Useful CSS navigation resource:
http://css.maxdesign.com.au/listamatic/

Technique to create tiled backgrounds:
How to Turn a Texture into a Seamlessly Tiled Background

Week 4 Reading:
Chapter 8 “Working with Stylesheet Files”
Chapter 17 “Forms”

Important: by now it is valuable to start using CSS Reset or CSS Normalize stylesheets to reduce browser discrepancies. Download the CSS Reset style here, or look at the newer CSS Normalize stylesheet here.

Session 2: Today we will be covering the next assignment which involves creating an XHTML form:

1. This week we will start by creating the form and layout using HTML5 and CSS.
2. Next we will use some simple Javascript to help validate the input from the user.
3. Thirdly we will will discuss server side scripting but it is not required.

Here’s a very basic table-less form formatted with CSS:

<html xmlns="http://www.w3.org/1999/xhtml">
<head>
<meta http-equiv="Content-Type" content="text/html; charset=ISO-8859-1" />
<title>Form Demo</title>
<style type="text/css">
<!--
input {
	display: block;
	width: 150px;
	float: left;
	margin-bottom: 10px;
}
label {
	display: block;
	text-align: right;
	float: left;
	width: 80px;
	padding-right: 5px;
	margin-bottom: 10px;
}

br {
	clear: left;
}
-->
</style>
</head>
<body>
<form action="mailto:test@email.com" method="post">
  <label for="first_name">First Name:</label>
  <input id="first_name" name="first_name" type="text" />
  <br />
  <label for="last_name">Last Name:</label>
  <input id="last_name" name="last_name" type="text" />
  <br />
  <label for="email">Email:</label>
  <input id="Email" name="last_name" type="text" />
  <br />
</form>
</body>
</html>

The following resource illustrates how forms can be put into horizontal, vertical, columnar, and other formats using CSS with fieldset, label, and legend tags:

http://www.themaninblue.com/experiment/InForm/
CSS-Based Forms: Modern Solutions

Week 5

Session 1: Today we’ll be looking at a complete example of an HTML5 form, similar to what is expected for the Interactive Form project. The form demo can be found here:

Form Demo

Once we have looked carefully at the form I will demonstrate how to use Javascript to pre-validate the input from the user. Javascript validation is a useful way to prevent users from leaving out required information from the form. However, server-side validation is also necessary in case Javascript has been disabled in the browser.

Reading:
Introduction to Javascript

Also, if you are looking for more ideas on form layout. Have a look at this list hosted on Smashing Magazine:

CSS-Based Forms: Modern Solutions and…
Diving into HTML5: Forms

Milestone: CSS Positioning (Cycling Assignment) During lab time today please be ready to show the progress items listed below.

1. Be prepared to show a completely designed (navigation, layout, type, colors images) HTML5 template.
2. Illustrate that your navigation is operational on a minimum of two pages.
3. Make use of hover behaviors and hit states in your navigation.

Session 2: Today we will start looking at more ways to design and organize the form input fields, including text fields, checkboxes, radio button, select lists, and text areas. We will also pay attention to layout, type faces, type treatments and Javascript. We will also look briefly at the server side scripting necessary to make the form function properly. Although applying this technique will not be required, it is recommended. The language we will be using to do this is PHP. The primary resources for PHP is php.net.

Interactive Form Project Requirements:
Create an interactive form designed to collect information from users, validate that required information has been entered via javascript. Optional: process the information, and send an email to yourself containing the user input. Required: The form must be designed well using HTML5 and CSS positioning. No table layouts are acceptable.

1. The form must contain a minimum of ten input fields.
2. Use of text fields, check boxes, radio buttons, select lists, and text areas are required.
3. Design the form with HTML5 and CSS (no table layouts).
4. Validate required fields with Javascript.
5. Use Google Fonts and typesetting CSS properties
6. Optional: Process the user input on the server side using PHP.
7. Optional: Automatically email the formatted data to your email address.
8. Due on Session 2, Week 7.

Week 6

Session 1: Today we will look at some more examples of Javascript form validation. Let’s also start discussing the next project that involves using javascript framework behaviors and also start thinking about the final project for the class.

Session 2: Continuing our focus on Javascript, let’s start examining a few projects that make Javascript more accessible and allow for advanced handling of content through the use of slideshow, gallery, carousel, and slider frameworks. These frameworks have become more and more popular for web and mobile content because modern browsers support HTML5 and Javascript features that rival Adobe Flash while working across many platforms including desktop/laptop computers, iOS (iPhone and iPad), and Android (phones and tablets). Here’s some links to examples:

JQuery
Light Box
Flexslider
Impress jS
Simple Carousel
Grid Nav

Javascript Gallery Assignment:
Implement a pre-existing Javascript framework to display a collection of images in a slideshow. Provide a way for the user to navigate between images and also expand images into a larger format.

1. Use a jQuery or Javascript gallery plugin to display images
2. Include a minimum of 6 images in your gallery (use your own work)
3. Provide a method for the user to navigate through the images
4. Allow the user to expand the image if thumbnails are in use
5. Make an effort to style the gallery differently than the default setting

Due: Session 2, Week 8.

Week 7

Session 1: Let’s finish working on our form projects today, so that we can move on to the next assignment that involves delving deeper into the possibilities of Javascript within web application design. We will be looking at several Javascript frameworks and then utilize JQuery to implement motion graphic elements into a web application. There are many advantages to using pre-existing Javascript frameworks, rather than writing new code from the ground up.

1. You are not reinventing the wheel
2. Browser compatibility in built into most frameworks
3. Large development and support communities surround the projects
4. Security exploits are quickly found and resolved by the developer community

Reading Assignment:
How jQuery Works
jQuery vs. MooTools
Animating with jQuery

Sessione 2: Today we will be discussing the requirements for the next project as well as having a look at your form projects.

Javascript Framework Project:
In this project we will be using a Javascript framework called JQuery to add functionality beyond what is possible with XHTML and CSS alone. Due on session 2 of week 8.

1. Use JQuery to animate hidden content into view
2. Integrate JQuery animation techniques to text navigation
3. Apply one or more tutorials from http://docs.jquery.com/Tutorials under one of the following headings:
    a) General Tutorials
    b) Manipulation, Attributes, and CSS
    c) Traversing and Selectors
    d) Using jQuery with…

Week 8

Session 1: Session 1: Today I’ll be demonstrating how to enable a Javascript framework within an HTML document. We will also start looking at how to apply functionality that exists in the framework to our web applications, including content animation behaviors as shown here:

http://wayfarerweb.com/animate-example.php

Session 2: After discussing the final project requirements we will look at your JQuery exercises.

Final Project Requirements:
The final project we are producing for this class involves creating a web application with a minimum of five content areas. The site content must be formatted using XHTML and CSS. It is also required that the site use behaviors included in the JQuery Javascript framework.

Final Web Application Content:
1. Create something that is suitable for your portfolio
2. Sites for organizations or businesses work well
3. Informational sites are also acceptable (FAQ, etc.)

Final Web Application Requirements:
1. You must include a minimum of 5 pages or content areas
2. All content must be formatted with XHTML (or HTML5) and CSS
3. It is required that the JQuery Javascript framework is used for animations, etc.
4. Use JQuery as an integral part of the UX.
6. You may not use Flash. This is a web standards project.

Final Web Application Evaluation:
1. All requirements must be met to achieve a passing grade on the final
2. The SCANMIC criteria will be used to evaluate the design and functionality

Session 2: The Web gallery assignment is due today. See week 6 for the detailed requirements for the Web Gallery project.

Week 9

Session 1: Let’s continue examining JQuery behaviors and how we can apply them to our web applications. Also, here are the requirements for the mockup milestone which are due before class starts on Session 2 of Week 9.

More jQuery examples (2012)
More jQuery examples (2013)

Mockup Milestone:
Two mockups of one page design are required for in class critiques on Session 2, Week 9

  1. Create a minimum of two mockups of a single page that contains a typical amount of content
  2. No mockups of splash pages!
  3. Try changing navigation, typefaces, layout, color schemes and/or logos
  4. Acceptable formats include: jpg, gif, png, pdf, html
  5. Presenting your mockups in class earns you 5% of the points for the final project
  6. Place your mockups in a folder under your name on the drop off drive before class on session 2, week 9 (next session)

Session 2: Today we will be reviewing everyone’s mockups in class. This is a group participation project that will last most of the session due to the size of the class.

Week 10

Session 1: Let try to continue to get a better understanding of how jQuery works and apply it to our finals. Also, we’ll be discussing how things are going on your final projects.

Prototype Milestone
On session 2 of week 10 (next session) I would like to see a working prototype of your final project.

1. Include working navigation to a minimum of three pages
2. Demonstrate the use of CSS in your layout
3. Discuss how you intent to use Javascript behaviors in your site

Session 2: Prior to presenting your milestone, most of the day will be focused on individually answering questions and help with troubleshooting.

Week 11

Session 1: Today is the last chance to get instructor feedback on your final projects.

Session 2: Today we’ll critique your final projects. These critiques are a required component for your final project, so don’t miss the classes.

Syllabus and Meeting Times

This course will introduce the student to concepts and designs utilized in the development of education, sales, and marketing presentations. Students will create an integrated, interactive multimedia presentation using the basic concepts and principles of multimedia and graphic design.

Instructor: John Keston

Meeting Times and Location Section (M/W):
M/W 8am – 11am (with appropriate breaks), Room 229, LaSalle building

Syllabus:
Please visit e-Companion to download the current syllabus

Required Reading:
Required readings are assigned on the weekly class posts.

Recommended Reading:
Program or be Programmed by Douglas Rushkoff

Week 1 | Week 2 | Week 3 | Week 4 | Week 5 | Week 6
Week 7 | Week 8 | Week 9 | Week 10 | Week 11

Week 1

Session 1: Authoring tools are software platforms that allow non-developers to create applications for specific computer operating systems, CD-ROMs, web sites, or mobile platforms. Typically these tools provide an integrated development environment or IDE. These system typically include a scripting language, or make a programming language more accessible for developers or designers. Examples include the following:

Dreamweaver (HTML,CSS,Javascript, et al)
Director (Lingo)
Eclipse (Java,C++, et al)
Flash (ActionScript)
Processing.org (Processing/Java)

New authoring tools are emerging all the time. Many of these are cloud based systems. The first authoring tool that we will examine is Prezi. Prezi is designed for creating interactive presentations that have a particularly engaging style of animation features built into the system.

Reading:
Investigate the tutorials and documentation at prezi.com/learn

Session 2: Today we will discuss the requirements for the Cloud Based Presentation (Prezi) project. Following the discussion I will be demonstrating some of the features and functionality within the Prezi authoring system.

Pick a topic that interests you and create a visual presentation with text and images using a cloud based authoring system (Prezi). Each slide should transition using the supported animation features from one slide to the next. Try tweens, scaling, and rotation. The presentation requires text and visual media on each slide, plus a minimum of one embedded video file (Competencies 1a, 1b). The project must be completed by Session 2, Week 2 for in class critiques. Final revisions are due at the beginning of class on Session 1, Week 3.

1. Use a cloud based authoring tool (Prezi) to build an electronic presentation
2. Create a minimum of 10 slides to inform your audience
3. Use animations to transition between slides
4. Include textual and visual media on each slide
5. Include at least one embedded video in the presentation
6. Experiment and be creative! Due on session 2, week 2 for critiques
7. Final revisions due on session 3, week 1

Week 2

Session 1: Today I will be looking at your Prezi projects so far. We will also start to take a look at using HTML5, CSS, and Javascript frameworks to author presentations. This is an example that I recently produced that is optimized for viewing on tablets and uses a system called Flexslider.

Post-prepared Piano Interface

Session 2: Let’s begin today’s class by presenting your Cloud Based Presentation (Prezi) projects. After the presentations we will discuss the requirements for the JS/HTML5 Slideshow project.

JS/HTML5 Slideshow project requirements: create an electronically deliverable presentation using HTML, CSS, and a Javascript framework such as Flexslider. Slides must contain a combination of media (no all image slideshows) including text, images, video and/or audio content. Your design should respond to various delivery mechanisms including computers, tablets, and mobile phones. Navigation should be in place to move from slide to slide, or to a specific slide within the presentation.

1. Use HTML, CSS, and Javascript to author your presentation
2. Include a minimum of 10 slides
3. Slide content must reflect various media types (text, images, video, audio)
4. Design must responsive (built into Flexslider)
5. Include linear and non-linear navigation
6. Customize the animation behaviors to suit your content
7. Due before class for critiques on session 1, week 5

Week 3

Session 1: As we learn to create presentations it is important to see examples of presentations created by expert speakers, artists, and designers. One excellent resource for this are the visiting artist lecture archive at MCAD. Today we’ll start by browsing the archive. Please take the time to watch one or more of the videos in full.

Secondly I will demonstrate techniques for the JS/HTML5 Slideshow project. We will go through the process of downloading, installing, and activating a Javascript slideshow framework. Specifically the framework will we utilize is called Flexslider.

Session 2: Let’s continue working with Flexslider. Today we will investigate customizing the behavior of the framework with the controls that are built into the system. These controls include callback functions that make it possible to extend the functionality of the framework without hacking the source code. This means that new functionality can be applied and maintained even if the Flexslider code base is updated.

PHP/jQuery Interactive Poll requirements: create an interactive poll using PHP and jQuery that allows visitors to see the results and participate by choosing their own answer for the poll question.

1. Use PHP to collect the answers and store the results in a database or flatfile
2. Use jQuery to display the results graphically as horizontal of vertical bars
3. Investigate techniques to prevent repeat voting (ip checking, cookies, registration)
4. Consider mechanisms to create multiple polls with a variety of questions
5. DUE: Milestone critiques – session 1 week 7
6. DUE: Final poll web application – session 2 week 7

Week 4

Session 1: Today we are meeting at the MCAD campus (2501 Stevens Avenue South Minneapolis, MN 55404) in Auditorium 150 to see the 2nd MFA thesis presentations. The presentations are open to the public, 10 minutes each, and start at 9am going until 11:45am. You are welcome to come at 9:00am to see all eight presenters, otherwise be there no later than 10:45am. Take good notes for in class discussion at our next meeting.

Session 2: After a brief discussion regarding the MCAD 2nd MFA Thesis Presentations, let’s begin demos for the PHP/jQuery Interactive Poll project. We will build this tool using PHP, Javascript, HTML5, and CSS. The first demo will involve writing user input from an HTML form into a server file using PHP. Once we have some data coming in we will read the information and build graphical representations of the data. More to come…

Week 5

Session 1: Today the HTML5/CSS/jQuery slideshow presentation critiques are scheduled. Please be prepared to show and discuss your project. Following the critiques we will continue with demonstrations for the Interactive Poll projects. Last week we looked at animating a bar graph to visualize the results of poll data. This week we will learn how to capture the data using HTML forms and PHP. Next we will process the information and apply the results to the animated bar graph.

Session 2: Today the final versions of your HTML5/CSS/jQuery slideshow presentation are due. A short period of the class will be available to show significant revisions to the project. Afterward, we will begin coding the server side code (PHP) required to build the Interactive Poll project. Please think carefully about the questions and answers you are planning on including in poll.

Week 6

Session 1: Today’s demo center around expanding the capabilities of the interactive poll. We will investigate using cookies to discourage repeat voting. We will also look at IP address tracking and timestamps as additional information stored with each vote. Finally, we will formulate a more efficient method of storing the votes in a flatfile.

Session 2: Today is the last demo associated with the interactive poll project. We will look at creating vertical versus horizontal bars, and other methods of visualizing the data. Let’s also consider building a system to dynamically create new polls. After the demos we will discuss upcoming projects.

Week 7

Session 1: Today are the critiques / presentations of your interactive poll projects. Final versions are due on session 2.

Session 2: Today we will start looking at impress.js. Although this framework does not include extensive documentation, it is fairly easy to implement and learn. Here are some link to get you started:

Official Impress.js Demo
Get to Know the Impress.js Presentation Tool
Create Stunning Visualizations with Impress.js

Link to in class demo archive:
ImpressJSDemo.zip

Impress.js Slideshow project requirements: create an electronically deliverable presentation using HTML, CSS, and the Impress.js Javascript framework. Slides must contain a combination of media (no all image slideshows) including text, images and HTML5 media elements (video and/or audio content). Navigation should be in place to move from slide to slide, or to a specific slide within the presentation. Use CSS3 transitions to animate between slides using x,y,z axis, scaling, and opacity.

1. Use HTML5, CSS, and Impress.js to author your presentation
2. Include a minimum of 10 slides
3. Slide content must reflect various media types (text, images, video, audio)
4. Design must responsive (built into Impress.js)
5. Include linear and non-linear navigation
6. Customize the animation behaviors to suit your content
7. Due before class for critiques on session 2, week 9

Week 8

Session 1: More demos of impress.js:

Session 2:Here are some CSS3 animation resources:

Animate.css is a is a bunch of cool, fun, and cross-browser animations for you to use in your projects. Great for emphasis, home pages, sliders, and general just-add-water-awesomeness.

Animate.css uses custom HTML attributes as described here.

Week 9

Session 1: Today we will start demonstrations in Flash CS6 / ActionScript 3.0 for the Flash timeline project.

Use Flash CS6 and ActionScript 3.0 to create an interactive timeline that contains a minimum of 10 steps. Also embed media including images and sound. Apply timeline animations using classic tweens, motion tweens, shape tweens, motion guides, and masks. Provide navigation for the user to go to any step from any step within the timeline.

1. Use Flash CS6 and ActionScript 3.0 to author your timeline
2. Include a minimum of 10 steps
3. Step content must reflect various media types (text, images, video, audio)
4. Use ActionScript to code non-linear navigation.
5. Create custom tweens to suit your content.
6. Due before class for critiques on session 1, week 11.

Session 2: Let’s present the Impress.js projects for critique today. After the critiques we will take another look at creating timeline navigation / animation sequences usin Flash CS5 and ActionScript 3.0.

Syllabus and Meeting Times

IM4470 eLearning Design & Applications

This course will introduce students to the principles of instructional design as applied to e-learning. The course introduces different options for authoring tools, principles of effective design, instructional analysis, and production of e-learning materials. Students design, build, evaluate, and revise instructional applications using industry standard authoring systems.

Instructor: John Keston
Meeting Times and Location:
M/W 11:00am to 2:00pm Room 304 (Pence)

Syllabus: IM4470 eLearning Design & Applications

Week 1 | Week 2 | Week 3 | Week 4 | Week 5 | Week 6
Week 7 | Week 8 | Week 9 | Week 10 | Week 11

Week 1

Session 1: Let’s begin class by discussing e-Learning systems and cover the class content for this quarter. We will start out by researching existing systems that are popular and used widely today. This includes Moodle and eFront, but the list far exceeds these well known examples.

Assignment 2: “Google-Fu” Interactive Design Research Skills
Due: Before Session 2 of the Assigned Week (6 points)

Description:
Each student will be assigned one of fourteen weeks (2-9) from the class content. The student is required to research the content for their week using Google and find three current and relevant web-based articles about the subject(s) contained within their assigned week that are not already included in the class content. The link to each article and a 1-3 sentence description must be entered as a comment on the class website before session 2 of the assigned week.

Requirements:
1. Enter one comment with three links and descriptions for the assigned week
2. Make sure the links are current, relevant, and not previously included
3. Enter your comment 24 hours before session 2 of the assigned week for approval

Points Breakdown:
1 point is awarded for each relevant link
1 point is awarded for an accurate description of the article

Session 2: Today we will have a discussion on Blooms Taxonomy.

Bloom’s Taxonomy is a classification of learning objectives within education proposed in 1956 by a committee of educators chaired by Benjamin Bloom who also edited the first volume of the standard text, Taxonomy of educational objectives: the classification of educational goals[1] (1956). Although named after Bloom, the publication followed a series of conferences from 1949 to 1953, which were designed to improve communication between educators on the design of curricula and examinations.

This language of classifications has worked its way into educational documents, curriculum, syllabi, tests, and evaluation since its inception. Bloom’s is an effective guideline for writing educational materials for both online and traditional classes. Please archive the following materials provided by Dana and reference them for upcoming projects and research:

Six Levels of Questioning
Bloom’s Revised Taxonomy: The Building Blocks of Knowledge
Aligning Teaching for Constructing Learning

Week 2

Session 1: We will start the second week by reviewing the syllabus and discussing the course objectives. This is a new course for me to teach and my expertise is in the practical application of technology rather than theory and research. However, in order to gain a viable understanding of this field it will be necessary to discover and write about new developments and standard practices in use. We will do this by writing a research paper, installing and configuring existing platforms, developing simple systems, and meeting with industry professionals.

Additionally IM4470 E-Learning is a 4000 level class. This means that I expect participation and initiative beyond lower level classes, but I also value your input as colleagues. In our discussion today I would like to learn from you what your expectations for the class are and what you would like to cover beyond what I have envisioned so far.

In class exercise:
Sign up for the free Stanford Online Course: Intro to Databases

Session 2: Today we will discuss the requirements for the E-Learning Research Project. The research paper and presentation will give you the opportunity to explore applications that have been developed for the purpose of authoring and distributing curriculum, training programs, tests, surveys, and other learning systems. These applications use electronic media and information and communication technologies (ICT) to attain educational outcomes.

E-Learning Research Project
Due on session 1 of week 4 before class
20 Points

Description: Write a four to seven page research paper that compares and contrasts two widely available e-learning applications. Use a minimum of seven cited sources (three for each application and Bloom’s Revised Taxonomy: The Building Blocks of Knowledge) to make your comparisons. You may use Wikipedia to discover sources, but do not use Wikipedia as a source of its own. Using the official website for the application is acceptable, but make sure that you have independent sources in addition to sources that are authored by the organization that manages the application. Start by writing a summary of the objectives and features of each application. Next, discuss the pros and cons of each application. Thirdly, investigate the history and community of each application. Forth, discuss how Bloom’s Taxonomy can be implemented into content that is authored by each system. Finally, conclude by summarizing the best uses for each system.

Requirements:

1. Write a four to seven page research paper using the MLA 7 guidelines.
2. Include a separate (in addition to the 4 to 7 pages) “Works Cited” page also using MLA.
3. Use a minimum of seven sources including Bloom’s Revised Taxonomy.
5. Include a summary, pros and cons, history and community, Bloom’s, and best uses scenarios.
6. Write your paper using Google Docs and share it with jck362 [at] gmail [dot] com by session 1 week 4.
7. Be prepared to present your findings in a five minute presentation on session 1 week 4.

Week 3

Session 1: Part of the process for understanding e-learning involves the examination of successful systems that are currently available. Khan Academy is a not-for-profit organization with the goal of changing education for the better by providing a free world-class education for anyone anywhere. All of the site’s resources are available to anyone. It doesn’t matter if you are a student, teacher, home-schooler, principal, adult returning to the classroom after 20 years, or a friendly alien just trying to get a leg up in earthly biology. Khan Academy’s materials and resources are available to you completely free of charge.

Learning Management System (LMS) Implementation Project
Install, configure, and develop content for a widely used Open Source LMS (we will be using eFront). eFront makes use of the LAMP architecture as described here.

1. Install eFront on your student webspace or comparable hosting.
2. Configure your implementation to suit the content you plan to create.
3. Develop a short module of course work within the system.
4. Prepare to present your implementation and content by session 2 of week 5.

Session 2: Why is there such an emphasis on technology in education? Is it simply that education has been using technology all along, but because technology is advancing so quickly it seems as though there is a greater emphasis now than in the past? What is the impact of mediating human interaction through machines? These questions are important to consider while researching e-learning. The following talk explains how technology helps children teach themselves.

Week 4

Session 1: Officially the implementation project has been changed so that there are option for the framework that you choose to implement. Unfortunately it is not possible to install the current version of Moodle on the student web space. It may be possible to work with a different LMS such as eFront. The option of using a different system instead of Moodle is available. Today we will look at the installation process for eFront and delve into some of the features within each system.

Session 2: Today I would also like to continue our examination of eFront. So far eFront seems to be a good alternative to Moodle. It has a much more modern and friendly user interface and pre-installs a course module that instructs new users how to use the system. After the eFront demos let’s discuss the requirements for the Instructional Video Production assignment.

Instructional Video Production Assignment
Create a two to five minute video that provides instructions for a particular task or sequence of tasks. Pick a topic that interests you or one in which you have a degree of expertise. Consider using a higher quality microphone to record dialog separately and edit it into the project using Adobe Premiere or a comparable application. Edit the video and use transitions in order to help articulate the technique or task that the viewer is learning.

1. Produce an instruction video between 2 and 5 minutes long.
2. Choose a topic that is interesting to you and that you know well.
3. Improve the audio by using equipment other than a mobile phone or computer mic.
4. Edit the video and audio for content, concision, clarity, and relevance.
5. Publish the video as content in a step or group of steps within a lesson or course.
6. Present your video with the implementation project by session 2 of week 6.

Week 5

Session 1: Today the research papers and presentations are due. Please review the requirements listed on week 2. After your presentations we will discuss the direction and features for our E-Learning Web Application Development Project. This project will be delivered in a workshop style through demos during lab time. The goal is to build a functional system with a small subset of tools and features that can be completed by the end of week 10.

In regard to the Instructional Video Production assignment, consider looking for resources that will help you produce instructional video. Here’s an article I found that covers preparation and best-practices:

White Paper – Producing an Educational Video

Also:

HYBRID PEDAGOGY: A Digital Journal of Learning, Teaching, and Technology

Session 2: The rest of the day we will start to work on the design documents for the E-Learning Web Application Development Project. We will be building a simple system for instructors to create projects for students and for students to submit their work for evaluation.

Screen Shot 2013-08-07 at 1.55.42 PM

When starting from the ground up building a content management system of any sort, often the best place to start is with the database schema. Before a building is erected scaffolding must be in place. The same is true of CMS, LMS, and many other kinds of applications. Here’s a list of database tables / columns that we will need:

Dropoff_DB_Schema_Notes

Week 6

Session 1: Today let’s pickup where we left off building the database for our LMS development project, “DropOff”.

Session 2: Implementation project presentations.

Week 7

Session 1: Today we will continue developing the DropOff project using PHP Object Oriented Programming techniques. If you have not already, please review the CodeAcademy.com modules linked below:

9 Object-Oriented Programming, Part I
10 Object-Oriented Programming, Part II

Session 2: Following the Instructional Video Production Assignment project presentations we will review the progress we have made so far on the DropOff project and begin to create classes for each database table.

Week 8

Session 1: Today we will be completing the insertDOUser method within the DOUser class. This will not take very long since it is a very similar process to creating the insertDOClass method for the DOClass class. Afterward we will shift gears slightly and create a method for the DOClass class that retrieves the items in the dropoff_classes table. Will we code the method so that it can either show all classes, or all classes specific to a particular user.

Session 2: Today will we continue coding the DropOff classes and methods as well as the controller. During the lab time I will be checking off that each student has met a list of required milestones.

LMS “Drop Off” Project Milestone #1
During lab time today, please be prepared to demonstrate the following features from the Drop Off project on your shared hosting service.

1. Illustrate that the session based authentication system is operating properly.

2. Show that your dashboard (index.php) displays the forms for adding classes and users.

3. Confirm that the insertDOClass and insertDOUser methods are active and functional from the dashboard.

4. Display a list of classes on the dashboard using the getDOClasses method and the scope resolution operator.

Week 9

Session 1: Let assess our progress so far on the Drop Off LMS and identify and prioritize several tasks that will work toward making the system functional at a rudimental level.

Session 2: Today I’d like you to think about what you will add to the system that is not part of the demos. Simply duplicating what I have presented in class is not enough for a passing grade on this project.

Your contributions might include:
1. HTML5 / Javascript form validation
2. Significant changes to the layout, styles, and typography
3. Carefully crafted content (classes/users/projects) within the system
4. Backend functionality that has not been shown during the demos

Once we have made the assessment I will continue by demonstrating how to implement the features that have been identified as a priority.

Week 10

Session 1: Last week I posted some suggestions on how to update your project beyond the code base that is provided. This week we will add a few more features and then find a good stopping point so that the rest of the time can be used to make your own personal updates to the system.

Important things to remember:
1. Turn in your project before the beginning of class on session 2, week 11.
2. Create the following user in your system (keston/abc1234)
3. Place an internet shortcut to your project and a .zip file of your code on the dropoff drive.
4. Beprepared to present your implementation of the Drop Off system during week 11.

Session 2: Let’s take a last look some of the work necessary to get to a final stopping point. I have updated the code with the forms, methods, and tasks to handle dropoff_projects. Let’s review these changes and solve a few more tasks in today’s demos.

Week 11

Session 1: Today we may have one or two demos depending on the type of questions asked during lab time.

Session 2: Final presentations.

Syllabus and Meeting TImes

AP2460 MIDI Systems I

This course allows students to develop a working, theoretical, and skills-based knowledge of the multi-timbral synthesizer and the sequencing environment within the context of the contemporary MIDI production studio. Both live and studio applications are covered, and full use is made of digital signal processing resources available within the equipment.

Instructor: John Keston (Schedule)

Meeting Times and Location:
Tuesday, Room 339 (LaSalle) 7:00pm – 8:00pm

Syllabus:
AP2460 MIDI Systems I Syllabus

Week 1 | Week 2 | Week 3 | Week 4 | Week 5 | Week 6
Week 7 | Week 8 | Week 9 | Week 10 | Week 11

Week 1

Session 1: In this class we will explore the vast world of MIDI systems. MIDI is a communication protocol that was introduced to the world in 1983 by music industry representatives. Electronic instrument pioneer, Dave Smith, devised the original concept. In 2013 Dave Smith and Ikutaro Kakehashi received technical Grammys for their contributions to MIDI, music technology, and the music industry at large. MIDI has become a critical component in modern studios and is used more and more to this day with few changes made to the original technology.

Isao Tomita surrounded by pre-MIDI era modular synthesizers

Session 2: MIDI has far exceeded its expectations at it’s conception. What has changed is how MIDI is used. Originally transmitted via MIDI cables, MIDI is now transmitted via USB, wireless networks, and between multiple software applications running on the same computer. MIDI files can be played by mobile phones, tablets, and computers. Millions of MIDI ringtones are used on mobile devices around the world.

Today we’ll take an introductory look at Propellerheads‘ suite of virtual intruments, Reason. Reason is a virtual studio rack with broad variety of instruments, processors, and sequencing tools. It also includes a massive soundbank including everything from orchestral sounds to synthesized effects. For our purposes Reason is also an excellent tool for learning about the MIDI protocol. Virtually every feature in Reason can be controlled with MIDI.

Reading:
http://en.wikipedia.org/wiki/Propellerheads_Reason

I’ll demonstrate how to import MIDI files into Reason and setup the MIDI tracks to play specific virtual instruments. Using this technique it is possible to produce your own music starting with a pre-built MIDI file by selecting the instrument sounds you prefer and manipulating the tempo, processing, and textures of the piece. The demo introduces a 15 point Reason project due Session 1, Week 3. The steps for the exercise follow:

1. Open Reason and add a 14:2 channel mixer device to the rack (Create > Mixer).

    Picture 1

2. Import a .mid file into Reason (File > Import > MIDI File). Use www.classicalarchives.com or www.creativecommons.org to find a MIDI file use can use for this exercise. Other sites, like mididb.com have many files available as well.
3. A Combinator is automatically created for each track in the MIDI file.

    Picture 2

4. Create instruments for each of the Combinators by pressing “show devices”.

    Picture 3

  • Right+click on the black rectangle in the Combinator and select an output device
  • Devices that produce pitched instrument sounds include: Subtractor, Maelstrom, Thor, NN-19, NN-XT
  • These devices produce percussive sounds or loops: Redrum (drum computer) and Dr. Rex (loop player)
  • Most other devices are processors of some sort (reverb, compression, etc.)
  • The Matrix is a pattern sequencer

5. Try applying processing as axillary sends.

  • Right+click on the mixer
  • Choose a processor such as the RV7000 for reverb
  • Picture 5

  • Turn up Aux 1 on the mixer for each track you’d like to process
  • Picture 6

6. Also try adjusting the tempo, transposing notes, and applying automation.
7. When you’re happy with your mix, render your document to an audio file named midi_exercise1.wav and copy it to the drop off under John Keston/ca2431/<your name>.

  • Choose File > Export Song as Audio File
  • Choose Reason WAVE File under Format
  • Choose 44,100Hz and 16bit

Week 2

Session 1: Today we’ll start by demonstrating how to apply processing and how to apply/edit automation in Reason. Almost every on-screen control in Reason can be fully automated simply by enabling recording and moving the control with the mouse or an assigned MIDI controller.

rackextensions

MIDI File Remix Requirements
This project is designed to introduce students to the concepts of MIDI data along with features and functionality associated with Propellerheads Reason. Start by choosing a MIDI file and importing it into Reason. Next browse and select instruments/presets for each individual track. Finally, apply processing and automation to producing the track to your liking. Also consider adjusting the tempo, transposition, and/or editing for length. Specific requirements:

1. Import a MIDI file of your choice into Reason
2. Explicitly choose instruments and presets for each track
3. Apply processing such as delay, reverb, equalization, or compression
4. Use automation to manipulate the controls on selected devices
5. Consider adjusting tempo, transposition, etc.
6. Render the remix to a 44.1kHz 16bit WAV file and copy to the dropoff drive
7. Due on session 1 of week 6.

Session 2: Today let’s take a look at using hardware MIDI controllers with Reason. Using a MIDI controller allows one to play in notes via a keyboard, or manipulate processing and automation with tactile control. After a MIDI controller demonstration let’s listen to your MIDI File Remix projects so far and I’ll give you some feedback and suggestions.

Week 3

Session 1: A great way to learn how to use software is by analyzing how experts use it. This is particularly true for Reason. Propellerheads include a selection of demonstration documents with Reason that illustrate the capabilities of the instrument suite. Each document is produced by an artist who has learned how to exploit the features of Reason to produce a distinct result.

Reason Demo Analysis Exercise
Choose a Reason demo song and try to understand how the artist achieved the results. Look carefully at how the instruments are connected and processed. Examine the sequencer window to see how automation was applied. Switch to edit mode (command+E) to look at the data up close. Try adding your own data to a control that has not been automated. Be prepared to discuss what you have learned from your analysis.

1. Pick one of the included demo songs for your analysis
2. Look at specific instruments and how they’re programmed and connected
3. Examine the processing applied to the song
4. Analyze the automation with the sequencer and edit mode
5. Manipulate automation, processing, and instrument programming for audible results
6. Add automation to an un-automated control for audible results
7. Be prepared to discuss what you learned by session 1 of week 4

Session 2: Reason one of thousands of applications perform MIDI sequencing. It is important to understand how to use other sequencers. This includes setting up, recording, and editing MIDI in Pro Tools. The next projects is designed for learning how to use Reason, or other virtual instruments as a sound source and Pro Tools as a MIDI sequencer.

Pro Tools MIDI Sequencer Project
Use Pro Tools to compose a multitrack project using the built in MIDI sequencer. MIDI tracks can be created in Pro Tools along side audio tracks, but for this project we will focus on layering MIDI tracks. Some of the concepts presented in this project include quantization, transposition, virtual instruments, velocity, and CC data. Consider sequencing outboard, MIDI hardware in conjunction with the virtual instruments.

Week 4

Session 1: Let’s get started on understanding the concepts necessary to create the Pro Tools MIDI Sequencer Project. Here are the project requirements:

Pro Tools MIDI Sequencer Project
Use Pro Tools to compose a multitrack project using the built in MIDI sequencer. MIDI tracks can be created in Pro Tools alongside audio tracks, but for this project we will focus on layering MIDI tracks. Some of the concepts presented in this project include MIDI channels, quantization, transposition, virtual instruments, velocity, and CC data. Consider sequencing outboard, MIDI hardware in conjunction with virtual instruments. Due before class on session 1, week 7.

1. Compose a piece of music using the MIDI sequencing built into Pro Tools
2. Use a minimum of four separate MIDI tracks mapped to a minimum of four instruments
3. Use Reason with Rewire for up to three of the instruments
4. For the fourth instrument use either an outboard MIDI instrument or virtual instrument not from Reason
5. Enter the notes using more than one technique (i.e. keyboard controller and mouse clicks)
6. Edit the MIDI data: quantization, velocity adjustment, duration, transposition, and CC data
7. Render the piece to an audio file and copy to the drop off drive before class on week 7

ProToolsMIDITrack

Session 2: Today’s demos will center on using the MIDI sequencing in Pro Tools to drive instruments in Reason using Rewire. We will also look at using keyboard controllers to enter velocity sensitive MIDI notes into Pro Tools.

Week 5

Session 1: Let continue demonstrating the techniques necessary to meet the requirements for the Pro Tools MIDI Sequencer Project. Topics of note will including mapping MIDI track to virtual instruments in Reason and Pro Tools, using hardware controllers, and creating/editing CC data automation. We will also review editing note values, velocity, duration, quantization, and transposition.

Session 2: Also, let’s discuss option for the final project.

Week 6

Session 1: For the final project for MIDI Systems I we will be using specific tools to create a generative musical composition and using MIDI in the process.

Final Project: Generative Music Composition
Compose a generative musical piece using software that provides one or more generative techniques. You may use GMS, Game of Life Sequencer, or other software per instructor approval. Your piece must be a minimum of 3 minutes long with a minimum of five distinct layers. Apply processing, automation, and carefully mix your piece to a stereo file.

1. Use one or more instructor approved applications to generate musical data in MIDI format
2. Edit, quantize, loop, and transpose the MIDI information in Pro Tools or a comparable DAW
3. Map a minimum of five layers of MIDI data to distinct virtual instruments (i.e. piano,strings, etc.)
4. There’s no maximum length within reason, but the minimum length is three minutes
5. Apply processing, automation, and carefully mix your piece to a stereo file
6. Present your project to the class during week eleven

Session 2: During today’s demonstration we will look at capturing MIDI from generative music software in Pro Tools. This will involve taking advantage of Apple’s IAC (Interapplication Communication) Drivers. If all goes well we may also look into creating ad hoc networks in order to interface with applications on the iPad from the computer.

Week 7

Session 1: Today let’s take a look at creating an ad hoc network to use iPad Apps as a virtual instruments within Pro Tools. The iPad music ecosystem is an economical way to gain access to a vast array of unique music apps. These range from full-fledged DAWs to complex virtual instruments to simple sequencers. The multitouch screen offers intuitive and efficient techniques for interacting with the applications.

Session 2: In today’s demos we will produce a simple MIDI track in Pro Tools that uses the iPad as the sound source.

Syllabus and Meeting Times

IM4490 Special Topics in Interactive Media

Topics are based upon important trends and developments in Interactive Media Design. Lectures, demonstrations, or research reports pertaining to areas of interest in Interactive Media Design presented by resident faculty, expert visitors, and working professionals. Group projects may also be assigned. Topics selected are based upon important trends and developments in the industry. Study and discussion of computer hardware, operating systems, networking, programming languages, interactive digital media, streaming media, entrepreneurship, marketing, workgroup organization, and the interactive industry are but a few possible topics that might be covered.

Instructor: John Keston

Meeting Times and Location:
Monday / Wednesday
10am – 11am (with appropriate breaks), Room L229, LaSalle building

Syllabus: Please visit e-Companion to download the current syllabus
Textbook:
Processing: A Programming Handbook for Visual Designers and Artists

Week 1 | Week 2 | Week 3 | Week 4 | Week 5 | Week 6
Week 7 | Week 8 | Week 9 | Week 10 | Week 11

Week 1

Session 1: In this class we will explore a variety of technologies and techniques that are used for new media art installations. We will look at a wide variety works by artists that span multiple disciplines. The media covered will include video, projection, motion graphics, data visualization, physical computing, touchscreen, mobile devices, and sound. As we research and propose projects we will also immerse ourselves in learning tools like Processing, MaxMSP, PureData, and SuperCollider. Using these technologies might seem overwhelming. One key thing to keep in mind is that it is not the complexity of a project that makes it successful, but the merit of the idea.

Session 2: Today we will review the requirements for the first assignment. It involves creating a project proposal and an artist statement. These are two distinct documents, but when submitting proposals for arts organizations an artist statement is often required. Artist statements are short documents that describe your motivation and inspiration as an artist. They may also describe your interests, goals, and existing work. They differ from biographies that are more likely to list projects, awards, performances, or exhibitions.

A project proposal describes in detail work that you plan to create for a particular exhibition, festival, or event. Project proposals include a three or four paragraph description of the work. They might also include diagrams, scores, images, sounds, or video files. Budgets are often necessary for grant applications or when reimbursement is expected. Today we will look at examples of both types of documents and outline what’s expected for the assignment.

Week 2

Session 1: Today we will begin an extended examination of the Open Source Processing language for experimental projects and research. Developed by Ben Fry and Casey Reas at MIT Processing has been used by artists, students, instructors, scientists, data visualization studios, and many others since 2001. If you have had IM2490 Motion Scripting then you have probably used Processing.js, a port of the Processing language to Javascript by jQuery founder, John Resig. In this class we will focus on using the Processing IDE (integrated development environment).

Session 2: Today let’s review the requirements for Special Topics: Problem Set #1. Out first problem set originates from examples that are packaged with the Processing IDE. Upcoming problem sets will require the book Processing: A Programming Handbook for Visual Designers and Artists.

Screen Shot 2014-04-06 at 1.19.05 PM

Special Topics: Problem Set #1 (5 points)
1. Create a new Processing sketch from the example found under Basics > Arrays > Array2D.
2. Modify the example in a minimum of five places to produce your new sketch.
3. Experiment with fill colors, background color, dimensions, coordinates, strokes, etc.
4. Save your experiment on the drop off drive under “John Keston/IM4490/Last, First/Problem Set 1/Array2D_demo.pde”
5. Be prepared to explain your modifications before class starts on session 1, week 3.

Week 3

Session 1: Today each of you will present your work on problem set #1. I will also be providing the final feedback for your proposals and artist statements. Once all of that has been covered I will present another Processing.org demo.

Session 2: Today you will be reviewing the requirements for problem set #2 involving radial gradients using the HSB color mode.

Special Topics: Problem Set #2 (5 points)
1. Create a new Processing sketch from the example found under Basics > Color > RadialGradient.
2. Modify the example in a minimum of five places to produce your new sketch.
3. Experiment with frame rate, x-y-r, background color, dimensions, coordinates, strokes, etc.
4. Save your experiment on the drop off drive under “John Keston/IM4490/Last, First/Problem Set 2/RadialGradientPS2.pde”
5. Be prepared to explain your modifications before class starts on session 1, week 4.

Week 4

Session 1: Today we will be presenting Problem Set #2. Also, final drafts of your project proposals and artist statements are due for jurying. I will also talk about some of my experiences at Moogfest.

Session 2: Today we will review the details of Problem Set #3. After that Vote on project proposals. Assign groups to each projects.
Homework: Solve Problem Set #3. Organize initial project tasks for group.

Special Topics: Problem Set #3 (5 points)
1. Create a new Processing sketch from the example found under Basics > Objects > Objects.
2. Modify the sketch to create an array of objects.
3. Modify the example in a minimum of four more places to produce your new sketch.
4. Experiment with color, shapes, keyboard input, mouse input, etc.
5. Save your experiment on the drop off drive under “John Keston/IM4490/Last, First/Problem Set 3/ObjectsPS3.pde”
6. Be prepared to explain your modifications before class starts on session 1, week 4.

Week 5

Session 1: Be prepared to present problem Set #3 to the class. Following the presentations let’s discuss details regarding the group project. Demonstrations may involve looking at specific problems related to your Northern Spark project. The examples found under Basics > Objects might be a good follow up to last weeks problem set.

Assignment For Week 5, Session 2: Look through the examples found in the Processing IDE and pick and example that you would like explained in class. Share what it is that you don’t quite understand about your example.

Session 2: Let’s review the details for Problem Set #4. Also, present your Processing example for explanations during the in class demonstrations. Finally, assign tasks for each group member for the final project. The assigned tasks should relate to each participant skill set. Be prepared to demonstrate your progress next week.

Screen Shot 2014-05-04 at 6.02.02 PM

Special Topics: Problem Set #4 (5 points)
1. Create a new Processing sketch from the example found under Basics > Form > TriangleStrip.
2. Modify the sketch to create a kaleidoscope effect.
3. Modify the example in a minimum of four more places to produce your new sketch.
4. Experiment with any Y axis mouse interaction, keyboard input, and color effects.
5. Save your experiment on the drop off drive under “John Keston/IM4490/Last, First/Problem Set 4/KaleidoscopePS4.pde”
6. Be prepared to demonstrate and explain your modifications in class starts on session 1, week 6.

Week 6

Session 1: Present your results for Problem Set #4. Today each group member will be showing their progress on the project so far. Discuss your progress on the assigned tasks and show any sketches, or examples of code that you have created.

Screen Shot 2014-05-04 at 7.01.39 PM

Session 2: Today we will review the requirements for Problem Set #5. Also, we will continue demonstrations in Processing that relate to the final group project.

Special Topics: Problem Set #5 (5 points)
1. Create a new Processing sketch from the example found under Topics > Simulate > SimpleParticleSystem.
2. Modify the sketch to involve user interaction with the mouse and keyboard.
3. Apply behaviors to mouseX and mouseY.
4. Experiment with keyboard controls to change particle size and color.
5. Save your experiment on the drop off drive under “John Keston/IM4490/Last, First/Problem Set 5/ParticlesPS5.pde”
6. Be prepared to demonstrate and explain your modifications in class on session 1, week 7.

Syllabus and Meeting Times

IM3460 Intermediate Authoring

This course will build on the skills taught in the Introduction to Authoring class. Students will design production quality interactive presentations using intermediate-level scripting techniques focusing on good user interface design and usability.

Instructor: John Keston

Meeting Times and Location:
Monday / Wednesday
11am – 2pm (with appropriate breaks), Room P305, Pence building

Syllabus: IM3460 Intermediate Authoring WI2015
Recommended Texts: TBD

Week 1 | Week 2 | Week 3 | Week 4 | Week 5 | Week 6
Week 7 | Week 8 | Week 9 | Week 10 | Week 11

Week 1

mobile-phone-426559_640

Session 1: The Intermediate Authoring course description leaves a lot open to interpretation. Traditionally this course has been used to delve further into Flash and ActionScript. Although these are still valuable skills the industry has been moving consistently away from Flash as mobile platforms have become more prevalent and HTML5 and JavaScript more ubiquitous.

This course will build on the skills taught in the Introduction to Authoring class. Students will design production quality interactive presentations using intermediate-level scripting techniques focusing on good user interface design and usability.

This happened largely because of Steve Jobs’ criticism of Flash and Apple’s move not to support Flash on iOS devices. Soon after Steve Jobs’ Thoughts on Flash in April, 2010 developers rapidly began to utilize HTML5 media elements for audio and video. The obvious advantage at first was that media could be played on iPhones and iPads where Flash browser plugins were scarce. However, soon it became apparent that many other advantages existed.

Though the operating system for the iPhone, iPod and iPad is proprietary, we strongly believe that all standards pertaining to the web should be open. Rather than use Flash, Apple has adopted HTML5, CSS and JavaScript – all open standards. Apple’s mobile devices all ship with high performance, low power implementations of these open standards. — Steve Jobs

Therefore, we will use this class as a platform to focus on mobile development from a variety of angles. Firstly, we will concentrate on applying mobile UI and UX principles to responsive web designs. This will involve learning how to apply media queries specifically for mobile devices, collapsing menus that will slide out with a touch gesture on smaller screens, and utilizing full-screen behaviors. Secondly, we will concentrate on hybrid and native application development for both iOS and Android.

Relevant Resources:
Responsive Web Design Basics
Building Mobile Apps with WordPress
Mobile UX/UI Considerations (Web or Native Apps)

Session 2: Today I will be covering the requirements for the first couple projects and exercises scheduled for the quarter. Following the discussion I will be demonstrating some of the techniques necessary to complete the first project.

Project 1: Responsive Mobile Web Application
Due: Session 2, Week 5 (25 points)

Description:
Develop a responsive mobile web application on a topic of your choosing. The application must use media queries to adjust the dimensions, layout, type, content, and functionality at a minimum of four breakpoints so that it functions well on the “multi-device web” (mobile phones, tablets, laptops, desktops, and large screens like TVs). Implement jQuery Mobile for touch interface optimization. Prepare for your project by writing a design document that includes a title page, project summary, feature list, and wireframes for each proposed breakpoint. Template mockups will be critiqued on session 1 of week 3. The completed project must be uploaded to the web by session 2 of week 5 for in-class presentations.

Requirements:
1. Start by writing the design document for concept approval by session 2 of week 2
2. The design document must include a title page, project summary, and feature list
3. Also include wireframes for each proposed breakpoint in the design document
4. Next prepare 2 or more template mockups for critique on session 1 of week 3
5. Your finished application must have a minimum of six pages or content areas
6. Include 4 or more breakpoints for dimensions, layout, content, type, and navigation
7. Implement jQuery Mobile into your application for touch interface optimization

Points Breakdown:
3 points are awarded for a clear and concise design document and concept approval
2 points are awarded for two or more template mockups and critique participation
3 points are awarded for successfully implementing four or more breakpoints
3 points are awarded for implementing jQuery Mobile for touch optimization
10 points are awarded for the overall design, content, and feature set of the web app
4 points are awarded for the clarity of your project presentation

Relevant Resources:
http://demos.jquerymobile.com/1.4.5/
http://demos.jquerymobile.com/1.4.5/intro/

Week 2

Session 1: This week we will begin demonstrations on media queries and jQuery Mobile. In addition we will select the individual weeks for the Google-Fu exercise. Please carefully make note of your assigned week(s) and post your comment 24 hours in advance for approval.

Assignment 1: “Google-Fu” Interactive Design Research Skills
Due: Before Session 2 of the Assigned Week (6 points)

Description:
Each student will be assigned one of nine weeks (2-10) from the class content. The student is required to research the content for their week using Google and find three current and relevant web-based articles about the subject(s) contained within their assigned week that are not already included in the class content. The link to each article and a 1-3 sentence description must be entered as a comment on the class website before session 2 of the assigned week.

Requirements:
1. Enter a single comment with three links and descriptions for the assigned week
2. Make sure the links are current, relevant, and not previously included in the course content
3. Enter your comment 24 hours before session 2 of the assigned week for approval

Points Breakdown:
1 point is awarded for each relevant link
1 point is awarded for an accurate description of the article

Theme Builder

Session 2: The design document for the Mobile Web Application project is due today for project approval. Please place a PDF of your document on the Drop Off drive before the end of class today. Also, let’s continue our jQuery Mobile demonstrations and research. One of the techniques we’ll look at today in particular is slide in menus. These menu systems are particularly useful for mobile sites because very little space is available on mobile phones for interface controls. Extensive menus can be brought in by tapping an unobtrusive icon and cleared by tapping anywhere off the menu.

Week 3

Hamburger Icon

Session 1: One of the most common techniques for improving the mobile web application user experience is to show/hide the universal navigation with a simple menu, or “hamburger” icon. This is a very simple technique that uses a combination of CSS3 media queries and JavaScript. In today’s demo we’ll look at this technique as well as explore more examples of how to apply jQuery Mobile features to our work in progress.

Session 2: After our Google-Fu discussion and mockup critiques let’s continue demonstrations using jQuery Mobile. Specifically today it will be important to have a functional, responsive navigation system in place. In order to do this we will have significant changes to the CSS across our media query breakpoints. A responsive slide out panel might be the best way to achieve this.

Mobile Web Application Milestone #1
Due: Week 4, Session 2

Be prepared for the milestone by implementing a fully function and responsive navigation system into your template work in progress. Also make sure you are able to illustrate this functionality by having placeholder content in place.
1. Have a hideable and responsive navigation system in place
2. Illustrate how your template responds at various breakpoints
3. Have placeholder content on a minimum of three pages or content areas

Week 4

Session 1: One of the most important considerations for Mobile UX is form design. Often standard checkboxes, radio buttons, select lists, and buttons are too small to effectively tap. Furthermore the form layout may not be conducive to touch interaction when mouse or trackpad pointers are the basis of the design scheme. Today we will look at the difference between laying out forms for mobile devices versus laptop or desktop machines. Here’s a few articles that explain some of the important factors involved in mobile form interaction.

Form design for usability across desktop and mobile
How to Optimize Your Checkout for Mobile Devices
10 Ways Mobile Sites Are Different from Desktop Web Sites

jQuery Mobile includes a variety of interface objects optimized for mobile. In today’s demo we’ll look at creating a simple web form that takes advantage of these tools.

Session 2: After the Google Fu presentations we will have studio time in order for each of you to show me what you have prepared for your project milestones assigned during week 3. With the remaining time I will demonstrate one more features in jQuery Mobile that we have not yet reviewed.

Week 5

Session 1: Let’s begin by discussing the final project for the class. We will be developing a native or hybrid mobile application for either iOS, Android, or both platforms. In contrast to our Mobile Web App project the native / hybrid application will open directly on the mobile device without needing to run within a web browser. After discussing the final project requirements we will have studio time in order to prepare for our Mobile Web App presentations on session 2.

gravidroid

Project 2: Native / Hybrid Mobile Device Application
Due: Session 2, Week 11 (25 points)

Description:
Develop a native (iOS SDK, Android SDK, Processing for Android) or hybrid (PhoneGap, IONIC, Appcelerator Titanium, et al) mobile application. Prepare for your project by writing a design document that includes a title page, project summary, feature list, and wireframes that illustrate the UI and functionality of the app. Implement a variety of media (images, video, sound, interaction) within the app feature set. The completed project must be demonstrated on a mobile device in class on session 2 of week 11 during presentations.

Requirements:
1. Start by writing the design document for concept approval by session 2 of week 6
2. The design document must include a title page, project summary, and feature list
3. Include wireframes that illustrate the UI and functionality of the app
4. Develop the native / hybrid application on a mobile device (iOS or Android)
5. Include a variety of features and media that support the mobile app concept
6. Demonstrate the functional application on your mobile device on session 2 of week 11

Points Breakdown:
3 points are awarded for a clear and concise design document and concept approval
3 points are awarded for participating in scheduled milestones during development
5 points are awarded for successfully implementing unique features and media into the app
10 points are awarded for the overall design, content, and feature set of the mobile web
4 points are awarded for the clarity of your mobile app demonstration

Relevant Resources:
iOS SDK
Android SDK
Processing for Android
PhoneGap
IONIC
Appcelerator Titanium

Session 2: Mobile Web Application presentations.

Week 6

10948995_1549602075326063_1900350276_n

Session 1: For our first of many native mobile application demonstrations we will be looking at Processing for Android. Although this mode for Processing is not as widely used as native SDKs and hybrid frameworks, it is an easy-to-learn and flexible technique for developing sophisticated, native, mobile applications for the Android platform. The main advantage of this approach is that it is not necessary to learn Java for Android. Processing is a much easier language to learn and it can also be used to create desktop applications through the Java mode and web applications through the JavaScript mode. Here are some of the steps and resources that will be useful for setting up the Processing for Android environment.

  1. Download and install the Processing IDE
  2. Setup the Android mode for Processing
    • Download the Android mode here
    • Unzip the file
    • Copy the “AndroidMode” folder to “Documents/Processing/modes”
  3. Install the Android SDK
  4. Use the Android SDK Manager to install the packages for the Android OSes necessary
  5. Use the Android AVD Manager to create one or more Android Virtual Devices

Session 2: Today Jeffrey Isham, Associate Technical Director at Olson will be our guest speaker to discuss PhoneGap, GSAP, other technologies, and the mobile application development life cycle.

Relevant Resources:
PhoneGap Android Platform Guide
PhoneGap iOS Platform Guide

Week 7

Session 1: This week I will be demonstrating the process of converting a simple jQuery Mobile web application to a bundled hybrid app using the Cordova/PhoneGap. Adobe provides an online service to make this process easier, but we will start by using the CLI (command-line-interface). If you plan to use this technique for your final project you may prefer to use Adobe PhoneGap Build. This service allows for one free private app and unlimited Open Sources apps hosted on a public GitHub repository.

Steps to install PhoneGap and build a project using the CLI:

1. Make sure you have properly installed the Android SDK and included it in your PATH

export ANDROID_HOME=${PATH}:/Users/john/android-sdk-macosx
export PATH=${PATH}:/Users/john/android-sdk-macosx/tools:
export PATH=${PATH}:/Users/john/android-sdk-macosx/platform-tools:

2. Follow steps to install PhoneGap via the command line here.
3. Follow the steps on the PhoneGap Android Platform Guide.
4. If you get the error: Failed to run “ant -version”, make sure you have “ant” installed and added to your PATH, run the following to install Apache ant:

ruby -e "$(curl -fsSL https://raw.githubusercontent.com/Homebrew/install/master/install)"
brew install ant

5. Once the project has been successfully built text it on an emulator or a device

Session 2: Today we will continue working on getting your environments setup for mobile app development.

Week 8

Session 1: Today let’s take a look at using PhoneGap to create iOS applications. In addition we may review the process of building PhoneGap apps for Android. I will also explain new JavaScript contained in my demonstration app.

Session 2: In addition to more PhoneGap demonstrations, please be prepared to show your work-in-progress on the final project. This might include tutorials that your have followed, tests that you have completed, and/or content or documentation that you have produced so far.

Week 9

Session 1: In today’s demo I will address some of the questions from last week. This may include one or more of the following topics

1. Image Capture
2. Server Side Functions with PhoneGap (using AJAX)
3. Saving In-App Progress or Preferences (Local Storage)
4. Share Buttons
5. Push notifications

Here’s a few links to related resources.
Capturing Camera Data without PhoneGap
PhoneGap Local Storage Documentation
Building a Native Mobile App with Cordova and jQuery Mobile

Session 2: I will not be in class today. Please use the class period as studio time and be prepared to share your findings next week. Thanks!

Week 10

Session 1: Most of this week will involve studio time to get each of you prepared for our presentations next week. Here are some resources that might help you will specific functionality that you intend to include in your projects:

jQuery Share Plugin
More jQuery Share Buttons
PhoneGap Push Notification Tutorial
Push Notification Sample Application

Session 2: Today we will have in-class progress reports in addition to ample studio time to prepare for your final project presentations next week.

Week 11

Session 1: Today will be the last session of studio time available. Please consult with me for any last minutes issues you may have with your Final Mobile Application projects.

Session 2: Final presentations.

Motion Graphics for Web Applications

Motion Graphics Screen Shot

Motion graphics and interactive animation are frequently used in web applications to enhance the user experience – commonly referred to as UX. These transitions lead the eye to important content or interface items. There are three primary techniques for creating this kind of functionality with web based applications: Adobe Flash, JavaScript, and CSS3 Transitions.

Adobe Flash

Although Flash used to be the dominant method, it is rarely used for web applications currently because many mobile web browsers no longer support the Flash plugin. This is in part because of Steve Jobs’ criticism of Flash and Apple’s move not to support Flash on iOS devices. It’s also because of the rise of HTML5 which includes open standards for video, audio, and interactive media eliminating the need for proprietary plugins.

Though the operating system for the iPhone, iPod and iPad is proprietary, we strongly believe that all standards pertaining to the web should be open. Rather than use Flash, Apple has adopted HTML5, CSS and JavaScript – all open standards. Apple’s mobile devices all ship with high performance, low power implementations of these open standards. — Steve Jobs

JavaScript

JavaScript is considered the programming language of the web. These days almost every web application uses JavaScript in one way or another. Although JavaScript is an easy language to learn it does require a basic understanding of computer programming to use it effectively. Fortunately there are many libraries or “frameworks” that make adding JavaScript behaviours to your web application much easier. JavaScript combined with the HTML5 canvas element allows for the development of sophisticated motion graphics and animation that were historically only possible in standalone applications.

Examples:
Chrome Experiments
Motion Scripting Examples

CSS3 Transitions and Animations

See the Pen Shard Wall 3D CSS Animation by Nate Wiley (@natewiley) on CodePen.


CSS3 transitions and animations are time-based effects that have the advantage of being applied using the familiar technique of CSS rather than using complicated JavaScript behaviours. CSS3 transitions and animations are supported in most modern browsers including IE 10 (older versions of IE are not supported), Chrome, Safari, Firefox, and Opera.

.animated_box {
    background: black;
    border: 1px solid #000;
    -webkit-animation: rotRect 3s ease-in-out 3s infinite alternate;
    animation: rotRect 3s ease-in-out 3s infinite alternate;
}
@-webkit-keyframes rotRect {
    0%   {background: rgba(0,0,0,128); -webkit-transform: rotate(0deg); width: 10%;}
    25%  {background: rgba(64,64,64,100); -webkit-transform: rotate(45deg); width: 20%;}
    50%  {background: rgba(128,128,128,75); -webkit-transform: rotate(90deg); width: 10%;}
    75%  {background: rgba(192,192,192,25); -webkit-transform: rotate(135deg); width: 5%;}
    100% {background: rgba(255,255,255,0); -webkit-transform: rotate(180deg); width: 20%;}
}
@keyframes rotRect {
    0%   {background: rgba(0,0,0,128); transform: rotate(0deg); width: 10%;}
    25%  {background: rgba(64,64,64,100); transform: rotate(45deg); width: 20%;}
    50%  {background: rgba(128,128,128,75); transform: rotate(90deg); width: 10%;}
    75%  {background: rgba(192,192,192,25); transform: rotate(135deg); width: 5%;}
    100% {background: rgba(255,255,255,0); transform: rotate(180deg); width: 20%;}
}

Relevant Resources:
W3Schools CSS3 Transitions
MDN: Using CSS3 Transitions
CSS: Animation Using CSS Transforms
CSS3 Transition Tutorial
Lea Verou’s Prefix Free Widget
Trigger CSS3 Transitions on Click