This course allows students to develop a working, theoretical, and skills-based knowledge of the multi-timbral synthesizer and the sequencing environment within the context of the contemporary MIDI production studio. Both live and studio applications are covered, and full use is made of digital signal processing resources available within the equipment.
Session 1: In this class we will explore the vast world of MIDI systems. MIDI is a communication protocol that was introduced to the world in 1983 by music industry representatives. Electronic instrument pioneer, Dave Smith, devised the original concept. In 2013 Dave Smith and Ikutaro Kakehashi received technical Grammys for their contributions to MIDI, music technology, and the music industry at large. MIDI has become a critical component in modern studios and is used more and more to this day with few changes made to the original technology.
Isao Tomita surrounded by pre-MIDI era modular synthesizers
Session 2: MIDI has far exceeded its expectations at it’s conception. What has changed is how MIDI is used. Originally transmitted via MIDI cables, MIDI is now transmitted via USB, wireless networks, and between multiple software applications running on the same computer. MIDI files can be played by mobile phones, tablets, and computers. Millions of MIDI ringtones are used on mobile devices around the world.
Today we’ll take an introductory look at Propellerheads‘ suite of virtual intruments, Reason. Reason is a virtual studio rack with broad variety of instruments, processors, and sequencing tools. It also includes a massive soundbank including everything from orchestral sounds to synthesized effects. For our purposes Reason is also an excellent tool for learning about the MIDI protocol. Virtually every feature in Reason can be controlled with MIDI.
I’ll demonstrate how to import MIDI files into Reason and setup the MIDI tracks to play specific virtual instruments. Using this technique it is possible to produce your own music starting with a pre-built MIDI file by selecting the instrument sounds you prefer and manipulating the tempo, processing, and textures of the piece. The demo introduces a 15 point Reason project due Session 1, Week 3. The steps for the exercise follow:
1. Open Reason and add a 14:2 channel mixer device to the rack (Create > Mixer).
2. Import a .mid file into Reason (File > Import > MIDI File). Use www.classicalarchives.com or www.creativecommons.org to find a MIDI file use can use for this exercise. Other sites, like mididb.com have many files available as well.
3. A Combinator is automatically created for each track in the MIDI file.
4. Create instruments for each of the Combinators by pressing “show devices”.
Right+click on the black rectangle in the Combinator and select an output device
Devices that produce pitched instrument sounds include: Subtractor, Maelstrom, Thor, NN-19, NN-XT
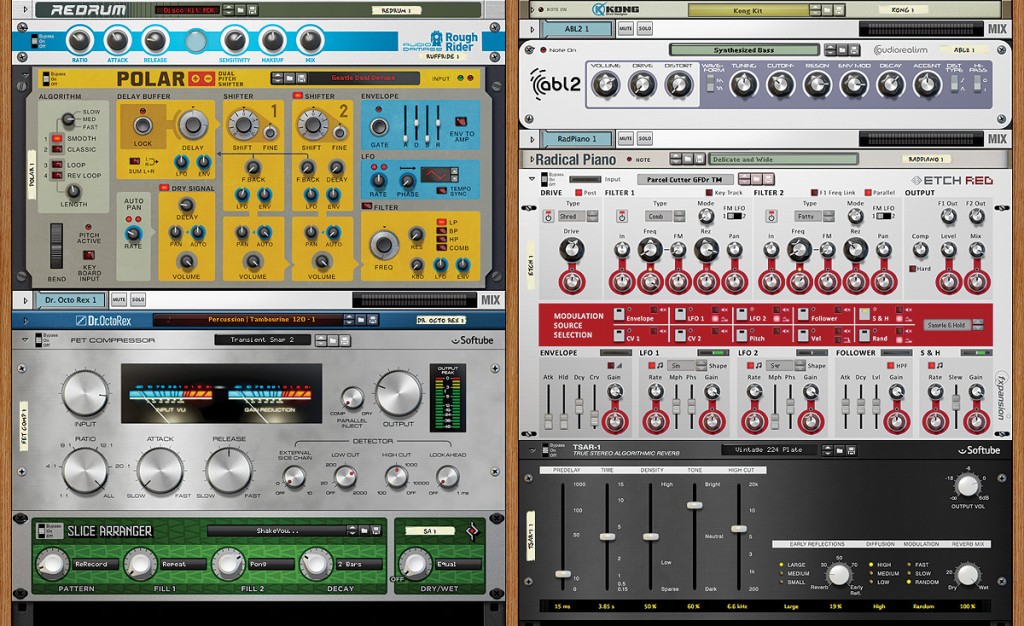
These devices produce percussive sounds or loops: Redrum (drum computer) and Dr. Rex (loop player)
Most other devices are processors of some sort (reverb, compression, etc.)
Turn up Aux 1 on the mixer for each track you’d like to process
6. Also try adjusting the tempo, transposing notes, and applying automation.
7. When you’re happy with your mix, render your document to an audio file named midi_exercise1.wav and copy it to the drop off under John Keston/ca2431/<your name>.
Session 1: Today we’ll start by demonstrating how to apply processing and how to apply/edit automation in Reason. Almost every on-screen control in Reason can be fully automated simply by enabling recording and moving the control with the mouse or an assigned MIDI controller.
MIDI File Remix Requirements
This project is designed to introduce students to the concepts of MIDI data along with features and functionality associated with Propellerheads Reason. Start by choosing a MIDI file and importing it into Reason. Next browse and select instruments/presets for each individual track. Finally, apply processing and automation to producing the track to your liking. Also consider adjusting the tempo, transposition, and/or editing for length. Specific requirements:
1. Import a MIDI file of your choice into Reason
2. Explicitly choose instruments and presets for each track
3. Apply processing such as delay, reverb, equalization, or compression
4. Use automation to manipulate the controls on selected devices
5. Consider adjusting tempo, transposition, etc.
6. Render the remix to a 44.1kHz 16bit WAV file and copy to the dropoff drive
7. Due on session 1 of week 6.
Session 2: Today let’s take a look at using hardware MIDI controllers with Reason. Using a MIDI controller allows one to play in notes via a keyboard, or manipulate processing and automation with tactile control. After a MIDI controller demonstration let’s listen to your MIDI File Remix projects so far and I’ll give you some feedback and suggestions.
Session 1: A great way to learn how to use software is by analyzing how experts use it. This is particularly true for Reason. Propellerheads include a selection of demonstration documents with Reason that illustrate the capabilities of the instrument suite. Each document is produced by an artist who has learned how to exploit the features of Reason to produce a distinct result.
Reason Demo Analysis Exercise
Choose a Reason demo song and try to understand how the artist achieved the results. Look carefully at how the instruments are connected and processed. Examine the sequencer window to see how automation was applied. Switch to edit mode (command+E) to look at the data up close. Try adding your own data to a control that has not been automated. Be prepared to discuss what you have learned from your analysis.
1. Pick one of the included demo songs for your analysis
2. Look at specific instruments and how they’re programmed and connected
3. Examine the processing applied to the song
4. Analyze the automation with the sequencer and edit mode
5. Manipulate automation, processing, and instrument programming for audible results
6. Add automation to an un-automated control for audible results
7. Be prepared to discuss what you learned by session 1 of week 4
Session 2: Reason one of thousands of applications perform MIDI sequencing. It is important to understand how to use other sequencers. This includes setting up, recording, and editing MIDI in Pro Tools. The next projects is designed for learning how to use Reason, or other virtual instruments as a sound source and Pro Tools as a MIDI sequencer.
Pro Tools MIDI Sequencer Project
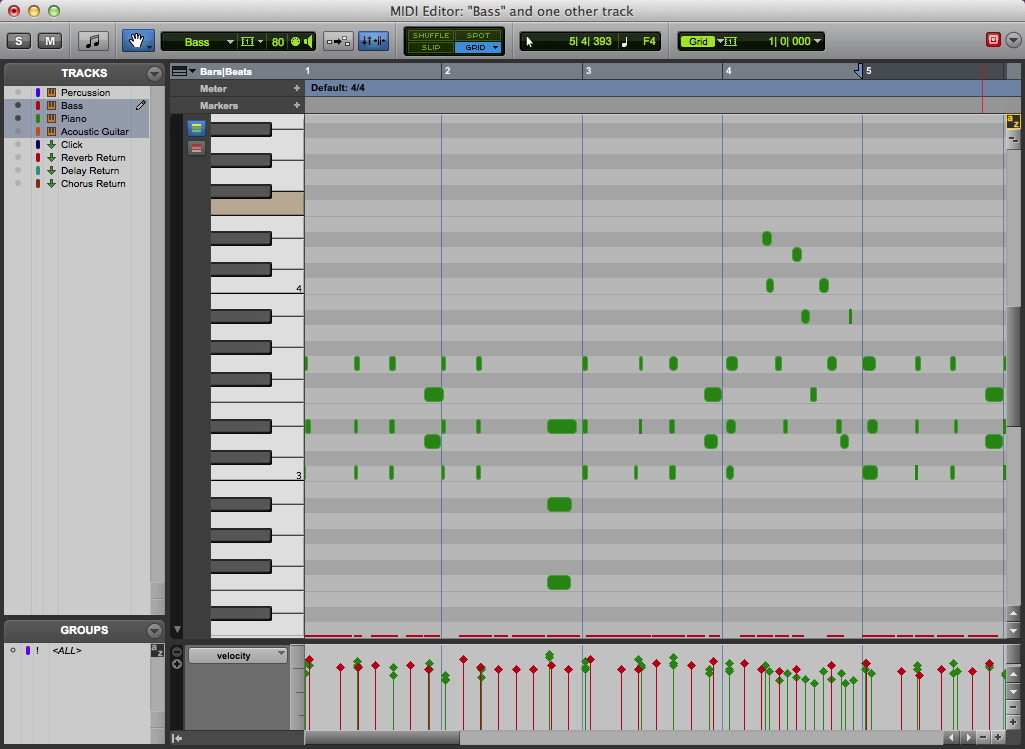
Use Pro Tools to compose a multitrack project using the built in MIDI sequencer. MIDI tracks can be created in Pro Tools along side audio tracks, but for this project we will focus on layering MIDI tracks. Some of the concepts presented in this project include quantization, transposition, virtual instruments, velocity, and CC data. Consider sequencing outboard, MIDI hardware in conjunction with the virtual instruments.
Session 1: Let’s get started on understanding the concepts necessary to create the Pro Tools MIDI Sequencer Project. Here are the project requirements:
Pro Tools MIDI Sequencer Project
Use Pro Tools to compose a multitrack project using the built in MIDI sequencer. MIDI tracks can be created in Pro Tools alongside audio tracks, but for this project we will focus on layering MIDI tracks. Some of the concepts presented in this project include MIDI channels, quantization, transposition, virtual instruments, velocity, and CC data. Consider sequencing outboard, MIDI hardware in conjunction with virtual instruments. Due before class on session 1, week 7.
1. Compose a piece of music using the MIDI sequencing built into Pro Tools
2. Use a minimum of four separate MIDI tracks mapped to a minimum of four instruments
3. Use Reason with Rewire for up to three of the instruments
4. For the fourth instrument use either an outboard MIDI instrument or virtual instrument not from Reason
5. Enter the notes using more than one technique (i.e. keyboard controller and mouse clicks)
6. Edit the MIDI data: quantization, velocity adjustment, duration, transposition, and CC data
7. Render the piece to an audio file and copy to the drop off drive before class on week 7
Session 2: Today’s demos will center on using the MIDI sequencing in Pro Tools to drive instruments in Reason using Rewire. We will also look at using keyboard controllers to enter velocity sensitive MIDI notes into Pro Tools.
Session 1: Let continue demonstrating the techniques necessary to meet the requirements for the Pro Tools MIDI Sequencer Project. Topics of note will including mapping MIDI track to virtual instruments in Reason and Pro Tools, using hardware controllers, and creating/editing CC data automation. We will also review editing note values, velocity, duration, quantization, and transposition.
Session 2: Also, let’s discuss option for the final project.
Session 1: For the final project for MIDI Systems I we will be using specific tools to create a generative musical composition and using MIDI in the process.
Final Project: Generative Music Composition
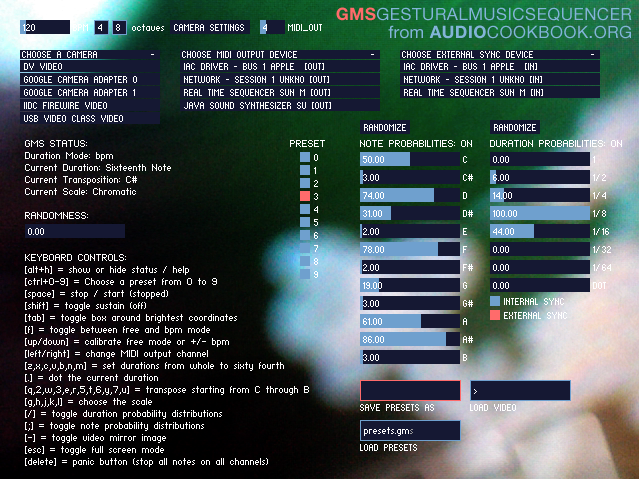
Compose a generative musical piece using software that provides one or more generative techniques. You may use GMS, Game of Life Sequencer, or other software per instructor approval. Your piece must be a minimum of 3 minutes long with a minimum of five distinct layers. Apply processing, automation, and carefully mix your piece to a stereo file.
1. Use one or more instructor approved applications to generate musical data in MIDI format
2. Edit, quantize, loop, and transpose the MIDI information in Pro Tools or a comparable DAW
3. Map a minimum of five layers of MIDI data to distinct virtual instruments (i.e. piano,strings, etc.)
4. There’s no maximum length within reason, but the minimum length is three minutes
5. Apply processing, automation, and carefully mix your piece to a stereo file
6. Present your project to the class during week eleven
Session 2: During today’s demonstration we will look at capturing MIDI from generative music software in Pro Tools. This will involve taking advantage of Apple’s IAC (Interapplication Communication) Drivers. If all goes well we may also look into creating ad hoc networks in order to interface with applications on the iPad from the computer.
Session 1: Today let’s take a look at creating an ad hoc network to use iPad Apps as a virtual instruments within Pro Tools. The iPad music ecosystem is an economical way to gain access to a vast array of unique music apps. These range from full-fledged DAWs to complex virtual instruments to simple sequencers. The multitouch screen offers intuitive and efficient techniques for interacting with the applications.
Session 2: In today’s demos we will produce a simple MIDI track in Pro Tools that uses the iPad as the sound source.