Syllabus and Meeting Times

IM3460 Intermediate Authoring

This course will build on the skills taught in the Introduction to Authoring class. Students will design production quality interactive presentations using intermediate-level scripting techniques focusing on good user interface design and usability.

Instructor: John Keston

Meeting Times and Location:
Monday / Wednesday
11am – 2pm (with appropriate breaks), Room P305, Pence building

Syllabus: IM3460 Intermediate Authoring WI2015
Recommended Texts: TBD

Week 1 | Week 2 | Week 3 | Week 4 | Week 5 | Week 6
Week 7 | Week 8 | Week 9 | Week 10 | Week 11

Week 1

mobile-phone-426559_640

Session 1: The Intermediate Authoring course description leaves a lot open to interpretation. Traditionally this course has been used to delve further into Flash and ActionScript. Although these are still valuable skills the industry has been moving consistently away from Flash as mobile platforms have become more prevalent and HTML5 and JavaScript more ubiquitous.

This course will build on the skills taught in the Introduction to Authoring class. Students will design production quality interactive presentations using intermediate-level scripting techniques focusing on good user interface design and usability.

This happened largely because of Steve Jobs’ criticism of Flash and Apple’s move not to support Flash on iOS devices. Soon after Steve Jobs’ Thoughts on Flash in April, 2010 developers rapidly began to utilize HTML5 media elements for audio and video. The obvious advantage at first was that media could be played on iPhones and iPads where Flash browser plugins were scarce. However, soon it became apparent that many other advantages existed.

Though the operating system for the iPhone, iPod and iPad is proprietary, we strongly believe that all standards pertaining to the web should be open. Rather than use Flash, Apple has adopted HTML5, CSS and JavaScript – all open standards. Apple’s mobile devices all ship with high performance, low power implementations of these open standards. — Steve Jobs

Therefore, we will use this class as a platform to focus on mobile development from a variety of angles. Firstly, we will concentrate on applying mobile UI and UX principles to responsive web designs. This will involve learning how to apply media queries specifically for mobile devices, collapsing menus that will slide out with a touch gesture on smaller screens, and utilizing full-screen behaviors. Secondly, we will concentrate on hybrid and native application development for both iOS and Android.

Relevant Resources:
Responsive Web Design Basics
Building Mobile Apps with WordPress
Mobile UX/UI Considerations (Web or Native Apps)

Session 2: Today I will be covering the requirements for the first couple projects and exercises scheduled for the quarter. Following the discussion I will be demonstrating some of the techniques necessary to complete the first project.

Project 1: Responsive Mobile Web Application
Due: Session 2, Week 5 (25 points)

Description:
Develop a responsive mobile web application on a topic of your choosing. The application must use media queries to adjust the dimensions, layout, type, content, and functionality at a minimum of four breakpoints so that it functions well on the “multi-device web” (mobile phones, tablets, laptops, desktops, and large screens like TVs). Implement jQuery Mobile for touch interface optimization. Prepare for your project by writing a design document that includes a title page, project summary, feature list, and wireframes for each proposed breakpoint. Template mockups will be critiqued on session 1 of week 3. The completed project must be uploaded to the web by session 2 of week 5 for in-class presentations.

Requirements:
1. Start by writing the design document for concept approval by session 2 of week 2
2. The design document must include a title page, project summary, and feature list
3. Also include wireframes for each proposed breakpoint in the design document
4. Next prepare 2 or more template mockups for critique on session 1 of week 3
5. Your finished application must have a minimum of six pages or content areas
6. Include 4 or more breakpoints for dimensions, layout, content, type, and navigation
7. Implement jQuery Mobile into your application for touch interface optimization

Points Breakdown:
3 points are awarded for a clear and concise design document and concept approval
2 points are awarded for two or more template mockups and critique participation
3 points are awarded for successfully implementing four or more breakpoints
3 points are awarded for implementing jQuery Mobile for touch optimization
10 points are awarded for the overall design, content, and feature set of the web app
4 points are awarded for the clarity of your project presentation

Relevant Resources:
http://demos.jquerymobile.com/1.4.5/
http://demos.jquerymobile.com/1.4.5/intro/

Week 2

Session 1: This week we will begin demonstrations on media queries and jQuery Mobile. In addition we will select the individual weeks for the Google-Fu exercise. Please carefully make note of your assigned week(s) and post your comment 24 hours in advance for approval.

Assignment 1: “Google-Fu” Interactive Design Research Skills
Due: Before Session 2 of the Assigned Week (6 points)

Description:
Each student will be assigned one of nine weeks (2-10) from the class content. The student is required to research the content for their week using Google and find three current and relevant web-based articles about the subject(s) contained within their assigned week that are not already included in the class content. The link to each article and a 1-3 sentence description must be entered as a comment on the class website before session 2 of the assigned week.

Requirements:
1. Enter a single comment with three links and descriptions for the assigned week
2. Make sure the links are current, relevant, and not previously included in the course content
3. Enter your comment 24 hours before session 2 of the assigned week for approval

Points Breakdown:
1 point is awarded for each relevant link
1 point is awarded for an accurate description of the article

Theme Builder

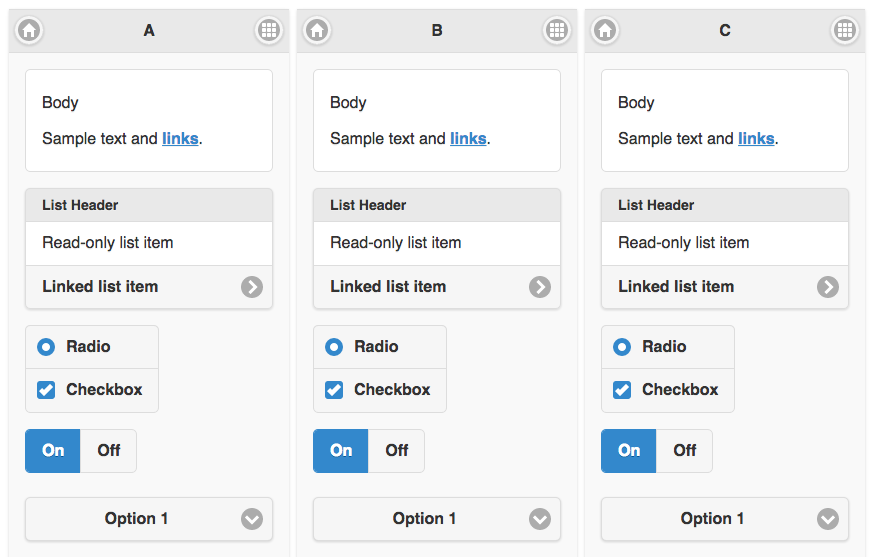
Session 2: The design document for the Mobile Web Application project is due today for project approval. Please place a PDF of your document on the Drop Off drive before the end of class today. Also, let’s continue our jQuery Mobile demonstrations and research. One of the techniques we’ll look at today in particular is slide in menus. These menu systems are particularly useful for mobile sites because very little space is available on mobile phones for interface controls. Extensive menus can be brought in by tapping an unobtrusive icon and cleared by tapping anywhere off the menu.

Week 3

Hamburger Icon

Session 1: One of the most common techniques for improving the mobile web application user experience is to show/hide the universal navigation with a simple menu, or “hamburger” icon. This is a very simple technique that uses a combination of CSS3 media queries and JavaScript. In today’s demo we’ll look at this technique as well as explore more examples of how to apply jQuery Mobile features to our work in progress.

Session 2: After our Google-Fu discussion and mockup critiques let’s continue demonstrations using jQuery Mobile. Specifically today it will be important to have a functional, responsive navigation system in place. In order to do this we will have significant changes to the CSS across our media query breakpoints. A responsive slide out panel might be the best way to achieve this.

Mobile Web Application Milestone #1
Due: Week 4, Session 2

Be prepared for the milestone by implementing a fully function and responsive navigation system into your template work in progress. Also make sure you are able to illustrate this functionality by having placeholder content in place.
1. Have a hideable and responsive navigation system in place
2. Illustrate how your template responds at various breakpoints
3. Have placeholder content on a minimum of three pages or content areas

Week 4

Session 1: One of the most important considerations for Mobile UX is form design. Often standard checkboxes, radio buttons, select lists, and buttons are too small to effectively tap. Furthermore the form layout may not be conducive to touch interaction when mouse or trackpad pointers are the basis of the design scheme. Today we will look at the difference between laying out forms for mobile devices versus laptop or desktop machines. Here’s a few articles that explain some of the important factors involved in mobile form interaction.

Form design for usability across desktop and mobile
How to Optimize Your Checkout for Mobile Devices
10 Ways Mobile Sites Are Different from Desktop Web Sites

jQuery Mobile includes a variety of interface objects optimized for mobile. In today’s demo we’ll look at creating a simple web form that takes advantage of these tools.

Session 2: After the Google Fu presentations we will have studio time in order for each of you to show me what you have prepared for your project milestones assigned during week 3. With the remaining time I will demonstrate one more features in jQuery Mobile that we have not yet reviewed.

Week 5

Session 1: Let’s begin by discussing the final project for the class. We will be developing a native or hybrid mobile application for either iOS, Android, or both platforms. In contrast to our Mobile Web App project the native / hybrid application will open directly on the mobile device without needing to run within a web browser. After discussing the final project requirements we will have studio time in order to prepare for our Mobile Web App presentations on session 2.

gravidroid

Project 2: Native / Hybrid Mobile Device Application
Due: Session 2, Week 11 (25 points)

Description:
Develop a native (iOS SDK, Android SDK, Processing for Android) or hybrid (PhoneGap, IONIC, Appcelerator Titanium, et al) mobile application. Prepare for your project by writing a design document that includes a title page, project summary, feature list, and wireframes that illustrate the UI and functionality of the app. Implement a variety of media (images, video, sound, interaction) within the app feature set. The completed project must be demonstrated on a mobile device in class on session 2 of week 11 during presentations.

Requirements:
1. Start by writing the design document for concept approval by session 2 of week 6
2. The design document must include a title page, project summary, and feature list
3. Include wireframes that illustrate the UI and functionality of the app
4. Develop the native / hybrid application on a mobile device (iOS or Android)
5. Include a variety of features and media that support the mobile app concept
6. Demonstrate the functional application on your mobile device on session 2 of week 11

Points Breakdown:
3 points are awarded for a clear and concise design document and concept approval
3 points are awarded for participating in scheduled milestones during development
5 points are awarded for successfully implementing unique features and media into the app
10 points are awarded for the overall design, content, and feature set of the mobile web
4 points are awarded for the clarity of your mobile app demonstration

Relevant Resources:
iOS SDK
Android SDK
Processing for Android
PhoneGap
IONIC
Appcelerator Titanium

Session 2: Mobile Web Application presentations.

Week 6

10948995_1549602075326063_1900350276_n

Session 1: For our first of many native mobile application demonstrations we will be looking at Processing for Android. Although this mode for Processing is not as widely used as native SDKs and hybrid frameworks, it is an easy-to-learn and flexible technique for developing sophisticated, native, mobile applications for the Android platform. The main advantage of this approach is that it is not necessary to learn Java for Android. Processing is a much easier language to learn and it can also be used to create desktop applications through the Java mode and web applications through the JavaScript mode. Here are some of the steps and resources that will be useful for setting up the Processing for Android environment.

  1. Download and install the Processing IDE
  2. Setup the Android mode for Processing
    • Download the Android mode here
    • Unzip the file
    • Copy the “AndroidMode” folder to “Documents/Processing/modes”
  3. Install the Android SDK
  4. Use the Android SDK Manager to install the packages for the Android OSes necessary
  5. Use the Android AVD Manager to create one or more Android Virtual Devices

Session 2: Today Jeffrey Isham, Associate Technical Director at Olson will be our guest speaker to discuss PhoneGap, GSAP, other technologies, and the mobile application development life cycle.

Relevant Resources:
PhoneGap Android Platform Guide
PhoneGap iOS Platform Guide

Week 7

Session 1: This week I will be demonstrating the process of converting a simple jQuery Mobile web application to a bundled hybrid app using the Cordova/PhoneGap. Adobe provides an online service to make this process easier, but we will start by using the CLI (command-line-interface). If you plan to use this technique for your final project you may prefer to use Adobe PhoneGap Build. This service allows for one free private app and unlimited Open Sources apps hosted on a public GitHub repository.

Steps to install PhoneGap and build a project using the CLI:

1. Make sure you have properly installed the Android SDK and included it in your PATH

export ANDROID_HOME=${PATH}:/Users/john/android-sdk-macosx
export PATH=${PATH}:/Users/john/android-sdk-macosx/tools:
export PATH=${PATH}:/Users/john/android-sdk-macosx/platform-tools:

2. Follow steps to install PhoneGap via the command line here.
3. Follow the steps on the PhoneGap Android Platform Guide.
4. If you get the error: Failed to run “ant -version”, make sure you have “ant” installed and added to your PATH, run the following to install Apache ant:

ruby -e "$(curl -fsSL https://raw.githubusercontent.com/Homebrew/install/master/install)"
brew install ant

5. Once the project has been successfully built text it on an emulator or a device

Session 2: Today we will continue working on getting your environments setup for mobile app development.

Week 8

Session 1: Today let’s take a look at using PhoneGap to create iOS applications. In addition we may review the process of building PhoneGap apps for Android. I will also explain new JavaScript contained in my demonstration app.

Session 2: In addition to more PhoneGap demonstrations, please be prepared to show your work-in-progress on the final project. This might include tutorials that your have followed, tests that you have completed, and/or content or documentation that you have produced so far.

Week 9

Session 1: In today’s demo I will address some of the questions from last week. This may include one or more of the following topics

1. Image Capture
2. Server Side Functions with PhoneGap (using AJAX)
3. Saving In-App Progress or Preferences (Local Storage)
4. Share Buttons
5. Push notifications

Here’s a few links to related resources.
Capturing Camera Data without PhoneGap
PhoneGap Local Storage Documentation
Building a Native Mobile App with Cordova and jQuery Mobile

Session 2: I will not be in class today. Please use the class period as studio time and be prepared to share your findings next week. Thanks!

Week 10

Session 1: Most of this week will involve studio time to get each of you prepared for our presentations next week. Here are some resources that might help you will specific functionality that you intend to include in your projects:

jQuery Share Plugin
More jQuery Share Buttons
PhoneGap Push Notification Tutorial
Push Notification Sample Application

Session 2: Today we will have in-class progress reports in addition to ample studio time to prepare for your final project presentations next week.

Week 11

Session 1: Today will be the last session of studio time available. Please consult with me for any last minutes issues you may have with your Final Mobile Application projects.

Session 2: Final presentations.